
ParaView
Overview
ParaView is an open-source, multi-platform data analysis and visualization application.
ParaView users can quickly build visualizations to analyse their data using qualitative and quantitative techniques. The data exploration can be done interactively in 3D or programmatically using ParaView’s batch processing capabilities.
Versions 5.6.0, 5.7.0, 5.9.0, 5.10.1, 5.11.0 and 5.11.2 of the pvserver/pvbatch OSMesa server tools (binary-install) are installed on the CSF.
An older version, 4.4.0, of the GUI paraview tool (binary-install) is also installed.
Choose your method of running ParaView
On CSF3, two preferred methods of running paraview are supported and one discouraged method:
- Client/server mode – the
paraviewGUI app must be installed on your PC or laptop – not the CSF. It connects topvserverprocesses running in a batch job on the CSF. These do the hard work of processing and rendering your data. Your data stays on the CSF – you don’t download it to your PC. Rendered images are sent back to your PC/laptop to be displayed in the ParaView GUI. - In purely batch mode –
pvbatchprocesses are run in a batch job on the CSF to process a ParaView script. No GUI is used. Rendered images, movie files or some other dataset may be generated and stored in new files on the CSF. - Discouraged: Run the
paraviewGUI on the CSF and display it remotely on your PC or laptop using remote X11. This method is strongly discouraged because it is slow and can make paraview feel unresponsive. It can, however, be used for very small / sparse meshes or using the spreadsheet (.csv) viewer and graph plotting tools. Using paraview for this type of work will avoid having to download files to your PC laptop to view in a spreadsheet app for example.
Note that it is strongly discouraged to run the Paraview GUI (paraview) directly on the CSF – in most versions except the older version 4.4.0 it is not even installed! The client/server method is by far the most efficient method of using Paraview on the CSF and allows you to easily visualize huge datasets without needing to download the data to your PC. Also, you do not need a powerful GPU in your PC.
The remainder of this page describes the above methods in detail. Firstly we cover in detail the client/server method for interactive use of the ParaView GUI (this is the recommended method). Then we cover batch-only non-interactive use. Finally, if you wish to use the third method of running the paraview GUI directly on the CSF jump to those instructions.
Summary of the Client / Server method
The first method (the client/server method) is the most common – you will use this to interactively examine your datasets. It is a little more complicated to set up, and requires you to install the ParaView GUI app on your PC/laptop, but allows you to visualize huge datasets stored on the CSF without needing a powerful local PC/workstation.
This is a four-step process. Detailed instructions are provided further down, but a summary of the steps is as follows:
- Firstly, you must install and run the ParaView GUI (
paraview) on your local PC/laptop. Please note: If you need help installing ParaView on a campus desktop or your laptop, please contact the Support Centre and they will arrange for this to be done. The research infrastructure team that look after the CSF cannot arrange this. - Then you run the parallel processing and rendering part of ParaView (
pvserverprocesses) on the CSF in a batch job. - Then you create an SSH (secure shell) tunnel from your PC to the CSF batch job (once it has started running the
pvserverprocesses.) - Then you run
paraviewon your PC/laptop and it will connect to the CSF, via the SSH tunnel, and make us of thepvserverprocesses. This is efficient because only the rendered images are sent to your PC over the network to be displayed in the paraview render window. Your datasets (which could be huge) are stored and processed entirely on the CSF.
While this may seem like a lot of steps, it is actually reasonably straight-forward and we provide complete instructions below. It is worth doing – using this method allows you to visualize very large datasets on the CSF from the comfort of your PC/laptop, without having to download those large datasets to your PC/laptop.
Note that the pvserver (or pvbatch) applications will not use any GPU hardware in the CSF. Instead all processing and rendering is performed in software on the compute nodes.
Remember, the paraview GUI app is not available on the CSF. You will need to install it on your PC/laptop and connect it to a pvserver job running in batch on the CSF. Complete instructions are given below. |
Restrictions on use
There are no restrictions on accessing the software on the CSF. The software is released under a BSD style license and all users should ensure they adhere to the terms of that license.
Installing ParaView on your local PC
You are going to run the paraview GUI on your PC/laptop and connect it to the CSF. To install ParaView on your PC please download the ParaView GUI client (which is in the full suite of ParaView tools) with the same version number you will be using on the CSF (see available versions below.) from the ParaView Download page for your platform (versions are available for Windows, MacOS and Linux – choose whatever your PC/laptop runs). Ensure you choose from the Version drop-down menu on the Downloads webpage!.
Note for Windows users: There might be a .zip package you can download which does not require administrator rights to install. Also, you do not need to install the MPI version. This is a parallel processing version of paraview but we are doing the parallel processing on the CSF, so the ordinary non-MPI version will be fine on your PC/laptop.
Once installed on your PC, do not run ParaView just yet. You first need to start the pvserver job on the CSF and then set up an SSH tunnel on your PC. Full instructions are given below.
Running pvserver in batch on the CSF
You will submit a batch job (just like any other batch job) to the CSF batch system to run ParaView’s pvserver app. This is an application to perform processing and rendering as instructed by the ParaView GUI.
For example, if you use the ParaView GUI to set up a pipeline that reads a data-file and then performs volume rendering, it is the pvserver processes running on the CSF that will do the actual file reading and volume rendering. The input data files must be on the CSF. The rendered image generated will be sent back to your ParaView GUI so that you can see it in the GUI.
The pvserver app can be run as a large CSF job, across multiple compute nodes, or as a smaller job on a few CPU cores in a single compute node. Examples of both types of jobs are given below.
Whether you submit a smaller single-node job or a much larger multi-node job mainly depends on how much data you will be loading in to paraview. Typically each pvserver process has access to approximately 8GB of RAM. So you may be able to estimate how many pvserver processes (and hence CPU cores) your job will need to be able to load and process your datasets. You may need to experiment – try submitting a smaller single-node job (e.g., 4 cores) to begin with. If your job runs out of memory, increase the number of cores.
For quick tests you can also use an interactive batch job to try to run the pvserver processes immediately. See below for how to do this.
We now recommend loading modulefiles within your jobscript so that you have a full record of how the job was run. See the example jobscripts below for how to do this. Alternatively, you may load modulefiles on the login node and let the job inherit these settings, in which case you should load:
# The version number you install on your PC must be the same as that used on the CSF.
# Load one of these modulefiles.
module load apps/binapps/paraview/5.13.3
module load apps/binapps/paraview/5.11.2
module load apps/binapps/paraview/5.11.0
module load apps/binapps/paraview/5.10.1
module load apps/binapps/paraview/5.9.0
module load apps/binapps/paraview/5.7.0
module load apps/binapps/paraview/5.6.0
Note: You do not need to install the MPI version on your PC. This would allow parallel processing of data locally on your PC. However, we are doing the parallel processing on the CSF, so the version installed on your PC can be as simple as possible – just the Paraview GUI.
Multicore single-node pvserver job
Create the following jobscript (e.g., naming it pvserver.sh). NOTE: the --force-offscreen-rendering rendering flag is required.
#!/bin/bash --login
#SBATCH -p multicore   # use the multicore partition (AMD genoa nodes)
#SBATCH -n 8           # Number of cores (can be 2-168)
#SBATCH -t 1-0         # Wallclock timelimit must be set, here is set to 1 day

# clean any previous modules then load the modulefile in the jobscript
module purge
module load apps/binapps/paraview/5.11.2

# $SLURM_NTASKS is automatically set to the number of cores requested above
mpiexec -n $SLURM_NTASKS pvserver --force-offscreen-rendering
Then submit the above jobscript using
sbatch jobscript
where jobscript is the name of your file (e.g., pvserver.sh)
Find where the pvserver batch job runs
You must now wait until the pvserver jobs are running. Use squeue to check the job queue. Once the state reported by squeue has changed from PD to R you will see something like:
  JOBID PRIORITY  PARTITION NAME            USER     ACCOUNT ST SUBMIT_TIME    START_TIME     TIME  TIME_LIMIT NODES CPUS NODELIST(REASON)
1758340 0.0000023 multicore pvserver_mpi.sb mbax3pm2 support R  06/06/25 09:02 06/06/25 09:02 0:08  1:00:00        1    8 node1251
Make a note of the NODELIST value(scroll to the right o see it) for your jobID. In this example we see node1251.
You can now jump to setting up the SSH tunnel to the CSF in order to be able to run the paraview GUI on your local PC and connect it to the pvserver batch job.
Small interactive pvserver job
This is for small test jobs only. For normal, large-dataset jobs, please see the multicore batch job method above.
If you are having to wait a long time for batch jobs (above) to start, try an interactive pvserver job. This will try to run the pvserver processes on a compute node immediately. However, please be aware that you should only request a small number of cores and the job will only last one hour before it is terminated.
# On the login node, try to start a 4-core interactive session using 'srun'

[username@login1[csf3] ~]$ srun -p interactive -n 4 -t 0-1 --pty bash

# Wait until you are logged in to a compute node. If the node is busy it will tell you to try again.

# You can tell we are on a compute node because the prompt changes - make a note of the node name:
[username@node1201[csf3] ~]$
We now have a one-hour session to use pvserver. The commands you would normally put in a jobscript should be given at the command-line on the compute node:
# Remember, we are now on a compute node (e.g., node1201). Load the module:
module purge
module load apps/binapps/paraview/5.11.2
cd ~/scratch/mydata                            # If you are not in the dir where your data is

# Run the command to start pvserver (exactly the same command you would use in a jobscript):
mpiexec -n $SLURM_NTASKS pvserver --force-offscreen-rendering
Remember that you’ll need the name of the node you have logged in to for later. This is easy in an interactive job – just look at the prompt. In our example above it is node1201.
Setting up the SSH tunnel from your PC to the CSF
We will now set up the SSH tunnel to the CSF from your PC/laptop. This allows the ParaView GUI on your PC communicate directly with your CSF batch job running the pvserver processes. The method used is very similar to how you log in to the CSF, just with some extra command-line flags, so don’t be too put off about doing this step. You will need the information from the squeue command that shows where your CSF batch job is running (see above).
Separate instructions are given for Windows and Linux/MacOS.
At this stage you must have ParaView installed on your local PC/laptop (see above). It doesn’t matter if the ParaView GUI is running or not yet on your PC.
SSH Tunnel on Linux or MacOS
In a shell (Terminal) window on your PC/laptop, create a tunnel between your local port 11111 and the CSF backend node’s port 11111 where the pvserver job is running. This will go via the CSF login node. In this example we assume the pvserver job is running on node node1251.
# This command must be run in a window NOT logged in to the CSF.
# If you can see the CSF prompt '[username@hlogin1 [CSF] ~]$' then you are doing this incorrectly!
ssh -L 11111:node1251:11111 username@csf3.itservices.manchester.ac.uk
                              #
                              # Use your IT username (and password when prompted, as usual)
where username is your CSF username and node1251 is the node where your pvserver job is running (use qstat on the CSF to find out). Do not close this shell. This connection must remain open to use ParaView. You do not need to type any commands in to this shell.
SSH Tunnel on Windows
You must have an SSH client, such as MobaXterm (or PuTTY), installed. Note that we are going to run a locally-installed Windows version of the ParaView GUI. The SSH application is just to set up the SSH tunnel.
If using MobaXTerm, start MobaXTerm on your PC then simply copy the ssh command given in the Linux instructions above in to the black MobaXTerm window (don’t forget to use the appropriate node name – e.g., node1251 – appropriate to your job – see above).
PuTTY instructions to follow.
Run the Paraview GUI on your PC/laptop
Now start your local installation of paraview:
- Linux or MacOS: Run the following command in a Terminal (aka Shell) window:
# This command must be run in a window NOT logged in to the CSF.
# If you can see the CSF prompt '[username@hlogin1 [CSF] ~]$' then you are doing this incorrectly!
paraview --server-url=cs://localhost:11111
ParaView will connect to the
pvserverprocesses through your local port11111. This has been tunnelled to the CSF backend node where the processes are actually running. You can now jump to Render Settings to ensure everything is working correctly. - Windows: Run
paraviewby selecting it from the Start menu (or desktop icon if you have one). Then follow the steps below.
Connecting the ParaView GUI to your CSF job
Note that Linux and MacOS users do not need to do these steps if you ran paraview on your PC/laptop using:
paraview --server-url=cs://localhost:11111
because that command will achieve what the following steps will do. You can jump to Render Settings to make some final tweaks to the settings. The steps below are mostly for Windows users who will need to do the steps using the ParaView GUI.
Once the ParaView GUI has appeared do the following:
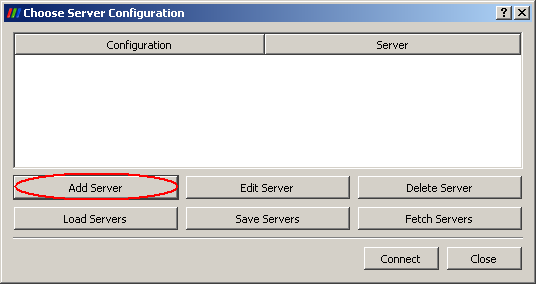
- Go to File > Connect
- In the Choose Server Configuration window that pops up, select Add Server
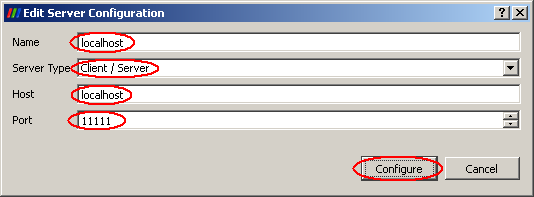
- Fill in the form to connect to your local port 1111 using the following then hit Configure:
- Name:
localhost - Server Type:
Client / Server - Host:
localhost - Port:
11111
- Name:
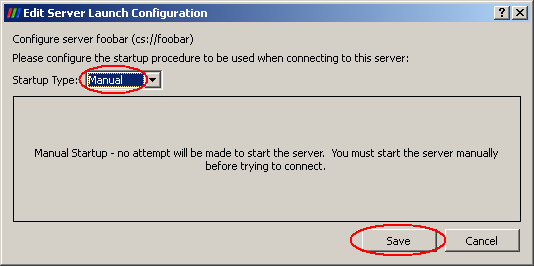
- In the Server Launch Configuration window ensure Manual is selected and hit Save
- Now select your saved configuration and hit Connect
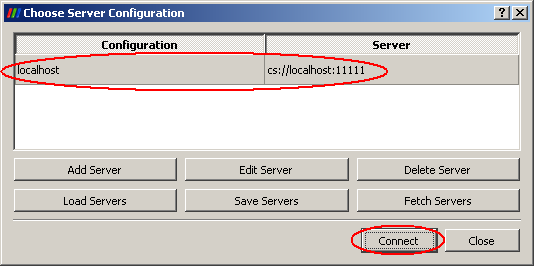


ParaView will connect to the pvserver processes through your local port 11111. This has been tunnelled to the CSF backend node where the processes are actually running.
Now jump to Render Settings to ensure everything is working correctly.
Render Settings
To ensure your local paraview client does no rendering work you should change the render settings in paraview. The default is to have your PC do a little bit of rendering work. We don’t want it to do any rendering otherwise it would have to transfer more data from the CSF to your PC.
- In the
paraviewGUI go to Edit > Settings… - In the Render View tab, type in a zero
0in the Remote Render Threshold box, as shown below. 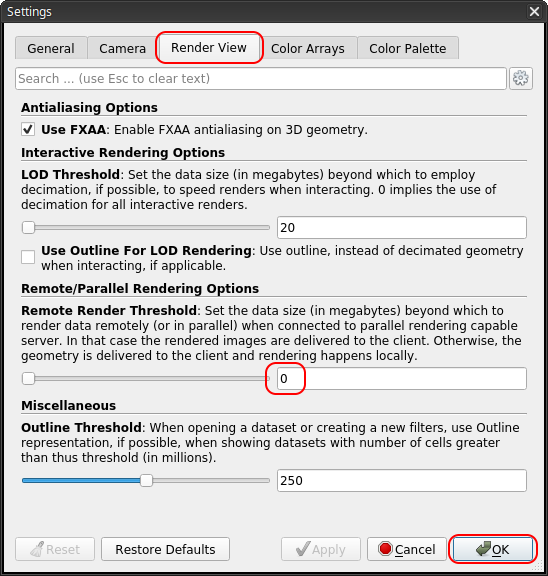
This will ensure all geometry data and rendering tasks remain on the CSF and only the final rendered image is delivered to your PC.
Testing the Connection to the CSF
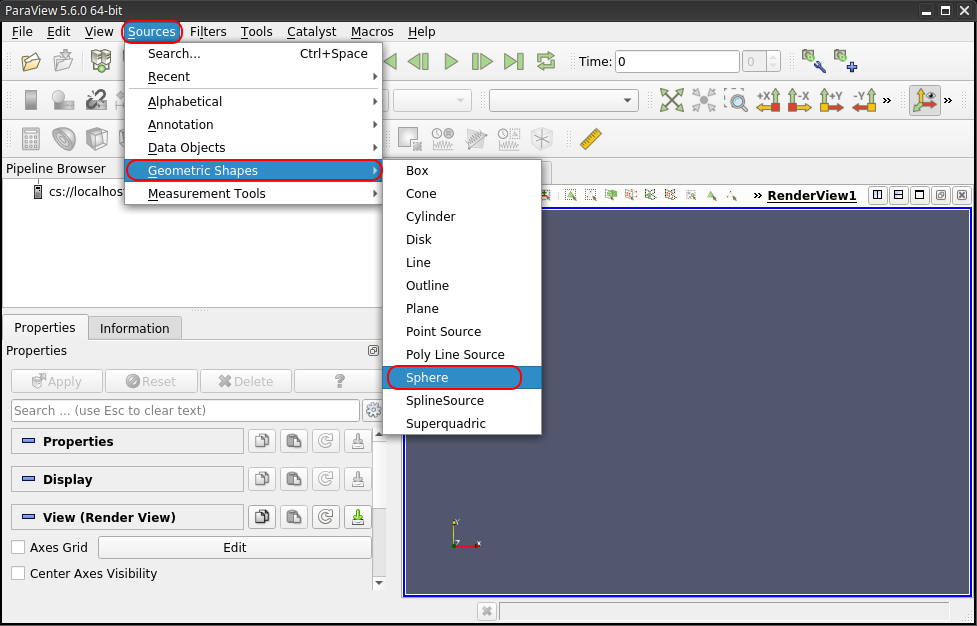
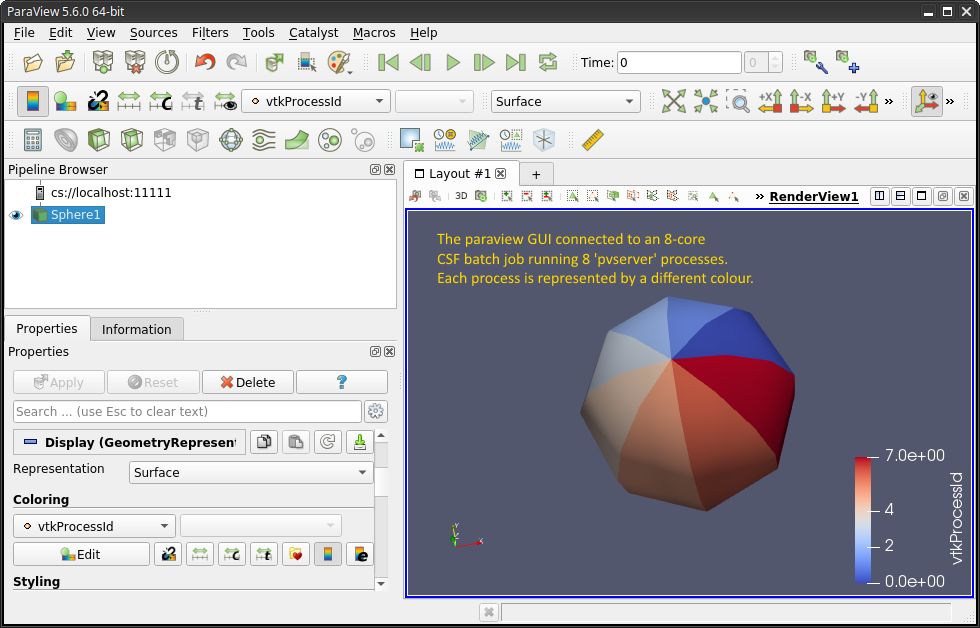
A useful way of checking what the remote pvserver processes are doing is to load a standard ParaView geometry (e.g., a sphere), or one of your own datasets, and then colour the data according to the processor ID on which the data is residing (ParaView distributes the gemetry amongst the pvserver processes). Hence you will see different colours for each pvserver used in the CSF batch job:
- Go to the Sources > Geometric > Sphere menu item to add a sphere to your pipeline.
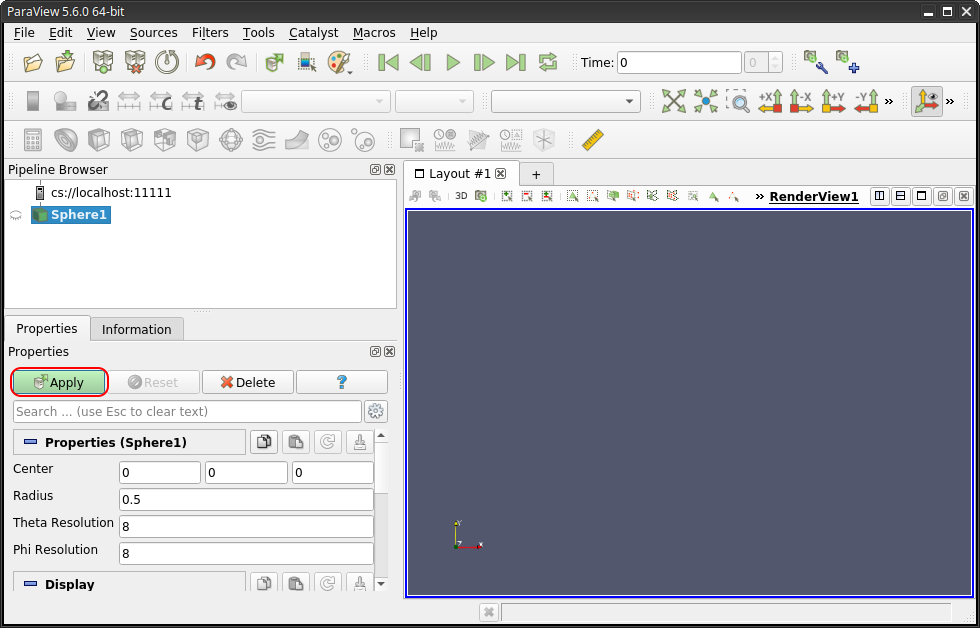
- Hit the Apply button to display the sphere. The sphere’s geometry data will exist on the CSF (in the
pvserverprocesses and be rendered by those processes. The final image of the sphere is then being sent back to your PC to be displayed in the ParaView GUI.
- Change the Solid Color drop-down menu in the toolbar (above the pipeline browser) to be vtkProcessID. The will change how the sphere geometry is rendered by assigning the
pvserverprocess ID to the parts of the sphere each process is responsible for.
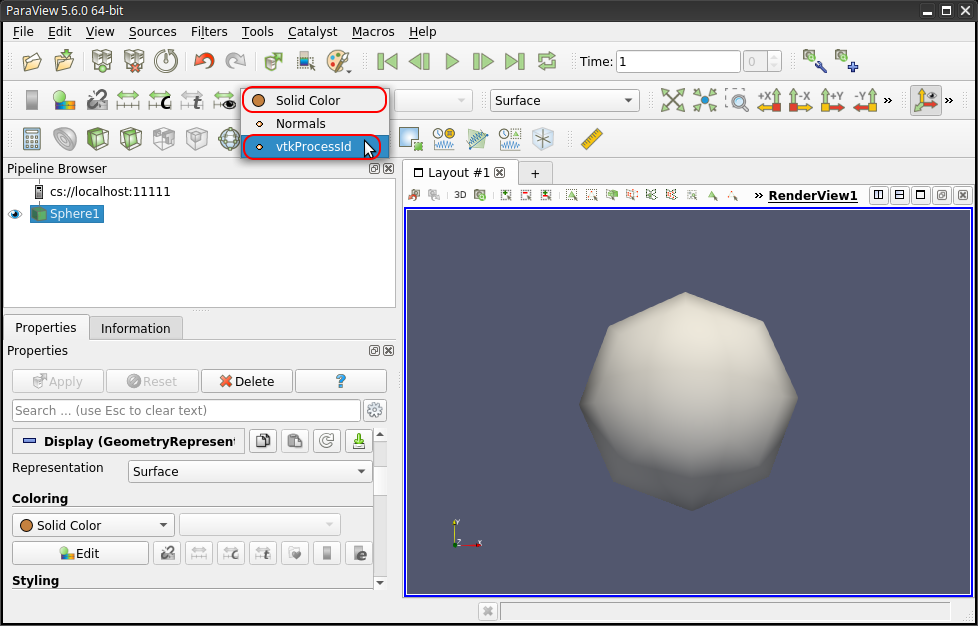
- You should now see that the sphere is rendered using 8 different colours. In this example we ran a CSF jobs with 8
pvserverprocesses. Hence 8 different colours are used to colour the sphere because each process is responsible for different sections of the sphere’s geometry.
Loading your own Datasets on the CSF
You can also load in your own dataset and apply the same technique as above. You will also notice that when you open the file browser, it will show you your files on the CSF, not those on your local PC. This is because the pvserver processes are running on the CSF and it is those processes that will read your data. If you want to visualize a dataset that is stored on your PC, you should transfer it to the CSF (using your preferred file transfer application) and then open the file in the ParaView GUI.
Exit and Clean up
Exiting from the paraview GUI will stop the backend pvserver processes, at which point you will have no ParaView jobs running in the batch system.
Close the SSH tunnel
Don’t forget to close the SSH tunnel. Otherwise you might not be able to make ParaView work correctly if you need to run it again using a new pvserver batch job.
Simply type
exit
in the shell window that is logged in to the CSF with the tunnel enabled. It will log you out of the CSF.
Hints and Tips
If the paraview GUI freezes or hangs it usually indicates a problem with the backend pvserver processes. Check the SLURM log file slurmNNNNNN.out (NNNNNN: the jobID), created by the batch job (the log file name could be different if you defined a custom one in your batch script). The most common problem is that the pvserver processes run out of memory because you don’t have enough running for the size of your dataset.
If your local paraview GUI crashes you should run squeue on the CSF to check if the pvserver processes are still running. If so, use scancel NNNNNN to kill the batch job.
If you can’t create the SSH tunnel, check you haven’t already got an SSH tunnel still open from a previous run of ParaView. Exit that logged-in session before starting a new one.
Running non-interactive (scripted) pvbatch (large datasets)
The pvbatch application allows you to run ParaView scripts without using the GUI. The entire job runs on the CSF, in batch, just like any other CSF job. The paraview GUI should not be running at this point.
After loading the ParaView modulefile use a jobscript to launch the pvbatch MPI processes. For example, to launch 4 backend processes, create the following jobscript (e.g., naming it pvbatch.sbatch):
#!/bin/bash --login
#SBATCH -p multicore   # use the multicore partition (AMD genoa nodes)
#SBATCH -n 8           # Number of cores (can be 2-168)
#SBATCH -t 1-0         # Wallclock timelimit must be set, here is set to 1 day

# Ensure the paraview modulefile is loaded
module purge
module load apps/binapps/paraview/5.11.2

# Run pvbatch - you do not control this with the paraview GUI
mpiexec -n $NTASKS pvbatch scriptfile
                               #
                               # where scriptfile is the file
                               # containing your paraview script
Then submit the above jobscript using
sbatch jobscript
where jobscript is the name of your file (e.g., pvbatch.sh)
Please see Online Paraview Guide for more information on using pvbatch.
Run the Paraview GUI directly on the CSF
This method is discouraged because it can lead to poor performance of paraview when visualizing large datasets (e.g., very dense meshes.) It can, however, be useful when using the spreadsheet view, say, and the chart plotting tools. It may mean you can avoid downloading files to your PC to use in a traditional spreadsheet app.
We will run the app in an interactive session on a compute node. Note: we do not allow paraview to be run directly on the login node and will kill off any instances we see running:
# Load the paraview GUI modulefile
module purge
module load apps/binapps/paraview/4.4.0-gui

# Now try to schedule an interactive job on a compute node.
# We request 4 cores for 1hr in this example:
srun-x11 -p interactive -n 4 -t 0-1 paraview
If you find that this method is too slow, please try the client-server method documented at the top of this page. Alternatively, you might get a small improvement in responsiveness from paraview if you access the CSF via our X2GO virtual desktop. Follow that link to read about it and for how to request an account on that service.
Further info
Updates
None.