
Jupyter Notebook (slurm)
Overview
Jupyter Notebook is an open-source web application that allows you to create and share documents that contain live code, equations, visualizations and explanatory text.
Please read carefully the instructions below when connecting a web-browser to your jupyter notebook on the CSF (slurm) – there are some extra steps needed that you would not normally do if you were running a jupyter notebook on your local desktop/laptop (or the x2go virtual desktop if using that).
It is possible to run jupyter notebook on the Nvidia GPU nodes. However, you need to request being added to the relevant group to access GPUs before you can run Jupyter Notebook on them.
Restrictions on use
There are no restrictions on accessing this software.
Set up procedure
To access the software you must first load the modulefile:
module load apps/binapps/jupyter-notebook/any # loads Anaconda3 2024.10 by default
If you’ve not already loaded a specific anaconda python modulefile, the above “any” modulefile will automatically load the latest Anaconda3 Python modulefile for you (jupyter is provided by Anaconda Python). If you wish to use a specific version of Anaconda python, you should load its modulefile first.
Initial Setup
No initial setup is needed to run jupyter notebooks.
It is possible, if you wish, to password protect your notebooks, which can be done using the commands below. But this is optional. By default a jupyter notebook will present you with a login page when you fist visit the notebook with your web-browser. You can setup a password via that webpage. You can also use the token-based security which the notebook uses if you don’t set up a password. This requires you to enter a random string of letters and numbers, which are reported in the job output .out file for the job running the notebook.
Hence only you can access your notebooks when they are running on the CSF, even if you don’t set up a notebook password.
Our recommendation is to use the default token-based authentication and not bother setting up a password for the notebooks.
Optional Setup
After loading the Jupyter Notebook modulefile, run the following on the login node:
jupyter-notebook --generate-config

# It will output:
Writing default config to: /mnt/iusers01/xy01/mabcxyz1/.jupyter/jupyter_notebook_config.py
   #
   # The xy01 group and mabcxyz1 username will differ
The command has reported where it has generated the configuration file (within your home area). The file is at (where ~ means your home directory):
~/.jupyter/jupyter_notebook_config.py
Optional Password Protection (skip this) [click to expand]
Password protecting the access to your running notebooks is optional. If you do not set a password then the notebooks are still only accessible by you – a notebook’s webpage will ask for a token (a random set of letters and numbers) to be entered, which only you can get from the job output slurm-NNNNN.out file (see below). It is very unlikely another user would be able to guess this token!
In fact we recommend that you skip password protection and use the token method instead – i.e., you don’t need to do anything here and can jump straight to running the notebook.
If you do wish to create a password to protect access to your notebooks when the server is running, do NOT use your central IT password. This is not a terribly secure method of protecting your notebooks but will offer some protection. Please do NOT use a password that is used on other systems or is valuable to you.
Run the following on the login node:
python -c "from jupyter_server.auth import passwd; print(passwd())"

# It will display:
Enter password: Enter your new notebook password and press [return]
Verify password: Enter the same password again and press [return]
argon2:$argon2id$v=19$m=10240,t=10,p=8$X4CyNDaKJw2rZhCQatsjbw$ZDUmJx5hfcUNsmGOBxNn3EfYa1SL3hzvt+2ZdU9rQDQ
  #
  # This line is the result (yours will be different).
  # We need to copy this in to the config file generated earlier.
Take a copy of the above line. Now edit the config file generated earlier:
xnedit ~/.jupyter/jupyter_notebook_config.py
  #
  # Could also use nano or vi or emacs editors
Search the file for a line that looks like:
# c.ServerApp.password = ''
and change it to be:
c.ServerApp.password = 'argon2:$argon2id$v=19$m=10240,t=10,p=8$X4CyNDaKJw2rZhCQatsjbw$ZDUmJx5hfcUNsmGOBxNn3EfYa1SL3hzvt+2ZdU9rQDQ'
#
# Notice we have remove the '#' at the start
where the argon2:.... is copied from the output generated earlier.
Now search the config file for a line that looks like:
# c.ServerApp.ip = 'localhost'
Change this to be:
c.ServerApp.ip = '*'
#
# Notice we have remove the '#' at the start
When you connect to a jupyter notebook server with a web-browser you will be asked for the password you specified earlier. Note that this does NOT use https (at the moment). So you should NOT use a password that is of value to you.
That is all of the setup we need to do. You can now start a jupyter-notebook job as described below.
We recommend that you skip password protection and use the token method instead – i.e., you don’t need to do anything here and can jump straight to running the notebook.
Running the application
Your jupyter notebook will run in the batch system on a compute node. The basic procedure is as follows:
- Submit a jupyter notebook job on the CSF and wait for it to run. We do this using a helper script named
jupyter-notebook-csfrun on the login node – no need to write a jobscript yourself! You can also use the command:jupyter-notebook-csf-slurm(it is the same script asjupyter-notebook-csf) - On your local desktop/laptop (or the x2go virtual desktop if using that) create an SSH tunnel to the CSF compute node running your jupyter notebook.
- On your local desktop/laptop (or the x2go virtual desktop if using that) connect a web-browser to the SSH tunnel – it will then connect to the CSF job.
Using an SSH tunnel may seem like a complicated method but it is the only way to reach the CSF compute node where your jupyter job is running. It also improves security – any traffic between your web-browser and the jupyter server will be encrypted.
The above procedure is now shown in detail below.
jupyter-notebook-csf helper script
Note that you can also use the command: jupyter-notebook-csf-slurm (it is the same script as jupyter-notebook-csf).
The jupyter-notebook-csf helper script mentioned above (used to submit a batch job from the login node) accepts the following flags:
jupyter-notebook-csf [-p PARTITION] [-n NUMCORES] [-t TIMELIMIT] [-m 32|46|62|125] [-g NUMGPUS]   [-j] [-k] [-P PORTNUM] [-c JOBID] [-T JOBID]

Starts a Jupyter Notebook server on a compute node.

-p PARTITION -- Run in PARTITION. Default is serial partition.
                -----------------------------------------------------------------------------------------
                PARTITION NAME  - DESCRIPTION
                -----------------------------------------------------------------------------------------
                multicore       - Run on the AMD nodes, 2-168 cores
                multicore_small - Run on the Intel nodes, 2-32 cores
                serial          - Intel nodes only, will run using 1 core
                himem           - Run on high memory nodes! 1-32 cores, -m MUST BE SPECIFIED (See below)
                vhimem          - RESTRICTED ACCESS Run on very high memory node (126GB/core) 1-32cores, -m must be specified
                gpuV            - !!! NO LONGER AVAILABLE !!!
                gpuA            - Run on the Nvidia A100 80GB GPU nodes IF YOU HAVE ACCESS TO SUCH NODES! 1-48 cores
                gpuA40GB        - Run on the Nvidia A100 40GB GPU nodes IF YOU HAVE ACCESS TO SUCH NODES! 1-48 cores
                gpuL            - Run on the Nvidia L40s GPU nodes IF YOU HAVE ACCESS TO SUCH NODES! 1-48 cores cores
                -----------------------------------------------------------------------------------------------------
-n NUMCORES  -- Request NUMCORES cores. Default is 1, max 168.
-t TIMELIMIT -- Time MUST be specified (default 1 day, max 7 days).
                Acceptable time formats include 'minutes', 'minutes:seconds', 'hours:minutes:seconds', 'days-hours', 'days-hours:minutes'
-m 32        -- Run on a 32GB/core (512GB) node (max 16 cores).
-m 46        -- Run on a 46GB/core (1500GB or 1.5TB) node (max 32 cores).
-m 62        -- Run on a 62GB/core (2000GB or 2TB) node (max 32 cores).
-m 125       -- run on a 125GB/core (4000GB or 4TB) node (max 32 cores). [REQUEST ACCESS BEFORE USING]
                If no -m flag given, the system will choose an ordinary compute node for you.
                If no '-p PARTITION' flag given, will default to the 'himem' or 'vhimem' partition.
                NOTE: you cannot use the -m flag if running on GPU nodes (-g flag).
-j           -- Generate the jobscript but DO NOT submit it. Debugging only.
-k           -- Keep the jobscript file after it has been submitted. Deleted by default.
                The autogenerated jobscript is not very useful to you.
-P PORTNUM   -- Port number from which to start searching for a free port for the
                the notebook server to listen on. Default starting port is 8888.
-g NUMGPUS   -- Run on the Nvidia GPU nodes IF YOU HAVE ACCESS TO SUCH NODES!
                Depending on your level of access you can request 1 -- 4 GPUs
                The '-p PARTITION' flags are required to specify the type of GPU (see above.)
                NOTE: you cannot use a GPU flag if running on himem nodes (-m flag).

To check whether a jupyter notebook job is running:

-c JOBID     -- report squeue status of job

Once a job is running, get info about accessing the notebook via a web-browser:

-T JOBID     -- read the job slurm.out file and report the token used for authentication.
                You can only do this AFTER the jupyter notebook batch job has started.
                This is to help with logging in to the notebook in a web-browser.

-h           -- Display this help.

Check the slurm.out file for instructions on how to connect
a web-browser to the server once the job runs.
We now go through the complete steps to using a Jupyter Notebook.
Complete Steps to Running a Jupyter Notebook
- Submit a jupyter notebook job using the helper script run on the CSF login node:
module load apps/binapps/jupyter-notebook/any

# Run one of the following examples on the login node:

jupyter-notebook-csf                               # Submit 1-core serial job w/ 1 hour timelimt
jupyter-notebook-csf -p multicore -n 4 -t 0-6      # Submit a parallel 4-core job using the AMD nodes w/ 6 hour timelimit
jupyter-notebook-csf -p highmem -n 4 -m 32 -t 0-6  # As above but requests 32GB/core RAM, runs on Intel himem node
jupyter-notebook-csf -p gpuA -n 12 -g 1 -t 0-6     # 12 core parallel job using 1xA100 GPU
The output from the helper script can be one of two things:
- If the job runs straight away in the batch system you’ll see:
Valid time format: 6:00:00
4 cores selected
Submitted batch job 1518
Checking if job has already started...
..
PLEASE READ THE FOLLOWING:
Starting jupyter-notebook on node1260 port 8888

You must now ssh in to the CSF3 from your local machine and tunnel
to the backend compute node. Use the following command on *your*
computer (not on the CSF3):

  ssh -L 8888:node1260:8888 username@csf3.itservices.manchester.ac.uk

You should then start a web-browser on *your* computer and browse to:

  http://localhost:8888

If you are asked for a token to login to the notebook, have a look in
this job's .out file for the token by running the following command:

  jupyter-notebook-csf -T 1518

(you should only run the above command *after* the batch job has started)

If you press the 'Quit' button in your notebook's web-page it will terminate the batch job.
If you press the 'Logout' button in your notebook's web-page or simply close the web-browser
then you *must* run the following command on the CSF3 to terminate the Jupyter batch job:

  scancel 1518

Don't forget to log out of your tunnelled ssh session.
This means that the jupyter-notebook job started immediately on a compute node so you are able to proceed with setting up the SSH tunnel from your local computer (or the x2go virtual desktop if using that) to the CSF and then connecting your web-browser to it by following the instructions in the above message (see below for an example).
- If the job doesn’t run immediately but waits in the batch queue:
Valid time format: 6:00:00
Submitted batch job 1528
Checking if job has already started...
....................

The job is probably still waiting to run. Here is your squeue output....

          JOBID PRIORITY  PARTITION NAME            USER     ST SUBMIT_TIME    START_TIME     TIME        NODES  CPUS NODELIST(REASON)
           1528 0.0000002 gpuA      jnotebook.25040 username PD 02/04/25 17:11 02/04/25 17:11             1      12 (Priority)

You *cannot* connect a web-browser to the CSF3 until the job runs.
Please be patient.

To check your job's status, run:

   jupyter-notebook-csf -c 1528

   (or simply run 'squeue')

When the job eventually runs you should then run the following command
to get further instructions on how to connect your web-browser to the
Jupyter notebook:

   cat slurm-1528.out

Follow the instructions given in that file.
Note that the job-ID
1528will be different for your job. The above message means that you must check on your job using thesqueuecommand to see when it is running. When it is running you can proceed with the instructions given in the file:slurm-NNNNN.outNNNNNwhere NNNNN is the job-ID of your own job.
- If the job runs straight away in the batch system you’ll see:
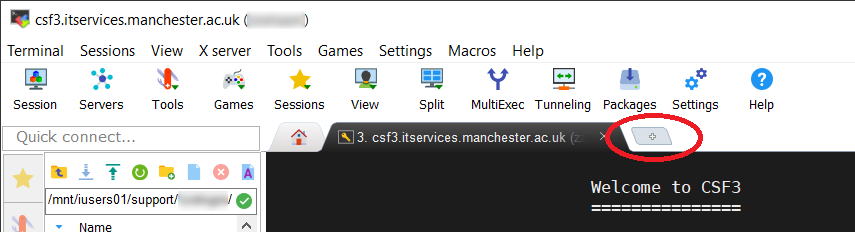
- Once the notebook job is running you can now set up the SSH tunnel on your computer (not the CSF). You’ll need to open another terminal window so that you have one that is NOT logged in to the CSF.For example, if you are on Windows use MobaXterm and press the new tab icon to open a Local Terminal (see image below), if on Mac use the Terminal application and if on linux use an Xterm or GNOME Terminal.
 Then run:
# Run this on your computer (PC/laptop), NOT in a terminal logged in to the CSF # The terminal window you run this in (e.g., MobaXterm) must NOT be logged in to the CSF. ssh -L 8888:node780:8888 username@csf3.itservices.manchester.ac.uk ^ ^ ^ ^ | | | | | | | +----- use your own central IT username here +-----+------+ | | +---------- These values (port numbers and compute node name) are reported in the above output when you submitted the notebook job. You should use the values appropriate to your job (the port will likely be 8888 but could be different. The node name will very likely be a different node number). Note also, some high-memory nodes as named hnodeNNN. - Now start a web-browser on your PC and browse to:
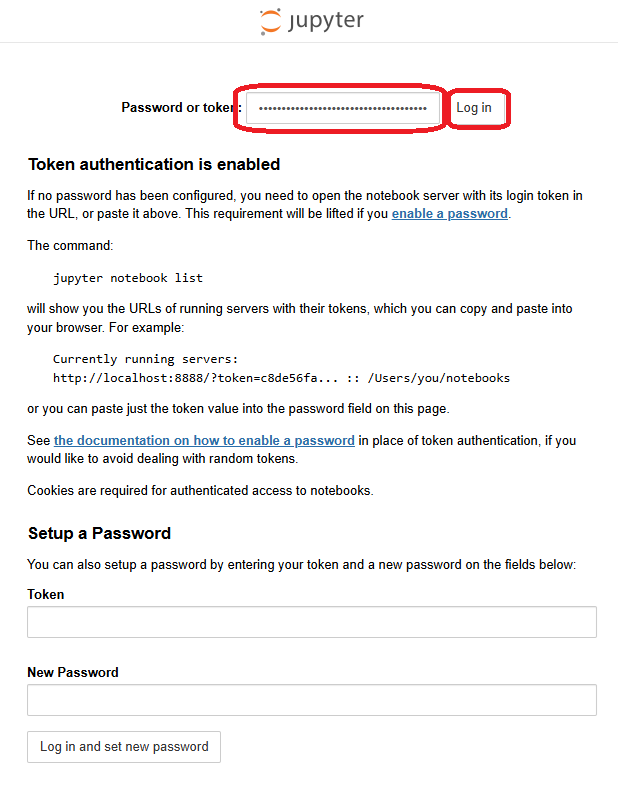
http://localhost:8888 # # Use the same port number as used above - You should be taken to the Jupyter Notebook login page. If you created a password earlier (most people don’t) then enter it in the webpage to access the jupyter notebook webpage. If you did not set up a password, the notebook’s webpage will indicate that token authentication is in use. You will need to get the notebook’s token (see below).
You can now use the Jupyter Notebook through your own web-browser. Any code you enter is executed on the CSF compute node on which the Jupyter Notebook server is running. Hence you should ensure your code uses the correct number of cores you reserved when you submitted the notebook job.
Obtaining the Notebook Token
When you visit your notebook in a web-browser you may be asked for a token if you didn’t set up a password. The token is similar to a random auto-generated password.
To find out what the token is for your notebook run the following command on the login node when your notebook is running and after you have pointed a web-browser at the notebook page (you’ll see the login page):
# Run this on the CSF login node, in the folder where you submitted the jupyter job from
jupyter-notebook-csf -T JOBID
where JOBID is the job id of your notebook job (run squeue if you are unsure). You should see lines similar to the following:
Authentication token for your notebook is 3827b48cc078578c5b50232f7835e6cb809c128a25a74294
Type it in to the webpage at: http://localhost:8888/  (if asked for a token)
OR browse to http://localhost:8888/?token=3827b48cc078578c5b50232f7835e6cb809c128a25a74294
Option 1: You can either browse directly to the notebook by appending the ?token=... text to the localhost URL we used above:
# Go directly to your notebook
http://localhost:8888/?token=3827b48cc078578c5b50232f7835e6cb809c128a25a74294
                   #                    #
                   #                    # Use the token shown in your output above, not this example!
                   #
                   # Use the same port number as used above
Option 2: or copy the token part of the address:
# Type this into to the box at the top of the page at http://localhost:8888
3827b48cc078578c5b50232f7835e6cb809c128a25a74294
             #
             # Use the token shown in your output above, not this example!
in to the type-in box in the notebook’s login web-page – use the box at the top of the screen, as show below:
Example Notebook
Once you have connected to your notebook, try the following in your web-browser:
- Select
New -- Python3to start a new python notebook. - Enter the following code in the first cell (see image below):
import os
file=os.getenv("JUPYTER_HOME")+"/example_job/mandelbrot.py"
%load $file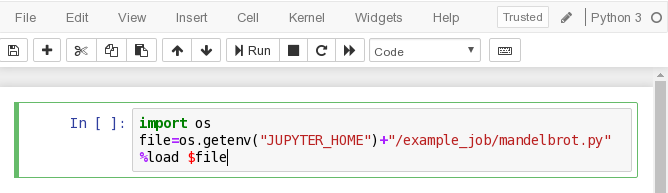
- Press the
Runbutton twice – firstly to load themandelbrot.pyin to the notebook. Then secondly to execute the notebook code. - You should see a Mandelbrot fractal image in your web-browser. The code was executed in the batch job running on the compute node!


Stopping a Notebook
When you have finished with the jupyter notebook you can either:
- Press the
Quitbutton in the notebook’s web-page to stop the notebook and terminate the jupyter batch job on the CSF - Press the ‘Logout’ button in the notebook’s web-page, or simply close your web-browser and, if you no longer want to connect back to the notebook, remove the job that is running on the CSF compute node using the usual
qdelcommand:# On the CSF login node: scancel 83873 # # Change the job id to be that of your notebook job. # If unsure, run 'squeue' to see a list of your jobs. - Don’t forget to log out of the window running the ssh tunnel created earlier.
Please do remember to stop your CSF server job via the Quit button or Logout button followed by the qdel command. Logging out of the notebook in your web-browser does NOT stop the CSF job. You MUST do this using qdel to free up the compute node for other users.
Using your Conda Environments with Jupyter Notebooks
If you have a personal conda environment (e.g., myenv) which you would like to use in jupyter, please do the following on the login node. It will install a package inside your conda environment to allow it to work with jupyter notebooks.
# Add a package to your conda env to allow it to be used with jupyter notebooks:

# You must do this via an interactive session, to have access to the outside world.
# This is needed to download a package. So, on the CSF login node:
srun -p interactive -t 60 --pty /bin/bash -l
  #
  # Wait until you've been logged in to a compute node, then:

# If you used Anaconda python to create the conda env then you should
# load the modulefile for that version of Anaconda now. For example:
module load apps/binapps/anaconda3/2024.10        # Load the version you used to create the conda env
source activate myenv                             # Activate your conda env

# Install a package in your conda env to allow jupyter to use the conda env
pip install --isolated ipykernel
pip install --isolated ipywidgets
python -m ipykernel install --user --name=myenv --display-name='Environment (myenv)'
source deactivate myenv

# Return to the login node:
exit
You can now submit a jupyter notebook job, using the “any” jupyter modulefile, which will NOT load an anaconda modulefile itself – hence you use your required version of anaconda
# Submit a notebook job as normal from the login node:

module load apps/binapps/anaconda3/2024.10        # Load the version you used to create the conda env
module load apps/binapps/jupyter-notebook/any     # Uses the anaconda version you loaded

# Now use the helper script to submit a job as described earlier. You DO NOT need to
# activate your conda env, either on the login node or in the job. The above ipykernel
# installation allows jupyter to find your conda envs.
jupyter-notebook-csf ...
Now when you connect to your notebook via a web-browser, you will be able to access your conda environment by selecting
# In your web-browser, in the jupyter main screen, start a new notebook with access to your conda env:
New --> Environment (myenv)
in the drop-down menu (at the top right-hand-side of the browser) to start a new python notebook “inside” your conda environment.
Further info
Updates
None.