Copying files to and from compute systems
Intro
Files can be transferred between your PC/laptop and the compute systems in a number of ways.
Please ensure that if you are transferring files to a system other than the CSF that you replace:
csf3.itservices.manchester.ac.uk
in the examples with the hostname of the system you are using, for example:
| System | Hostname used for access |
|---|---|
| iCSF | incline.itservices.manchester.ac.uk |
| CSF3 | csf3.itservices.manchester.ac.uk |
| RDS SSH *** See note below | rds-ssh.itservices.manchester.ac.uk |
| Condor | submitter.itservices.manchester.ac.uk |
*** RDS-SSH – we do not automatically register users onto this service. If you have a requirement to use it please contact us via our help form to request an account.
From/To a Linux or MAC PC/laptop
Linux users can do this by using either scp or sftp, from the OpenSSH utilities suite (which comes with all popular distributions), for example (replace username with your own IT username):
- Copy a file from your local machine to your CSF home directory (don’t forget the
:at the end)scp myfile.txt username@csf3.itservices.manchester.ac.uk:
- Copy a file from your CSF home directory to your local machine
scp username@csf3.itservices.manchester.ac.uk:results.out results.copy
- Copy a file from your local machine to your CSF scratch area
scp file.input username@csf3.itservices.manchester.ac.uk:~/scratch/
- Copy a file from your CSF scratch area to your local machine
scp username@csf3.itservices.manchester.ac.uk:~/scratch/results2.out results2.copy
All of the above commands are run in a terminal on your laptop/desktop that IS NOT connected to the CSF (or other compute system) i.e. the commands are run on your local machine not on the CSF.
From/To a Windows PC/laptop
Method 1: MobaXterm
**PLEASE NOTE** – November 2022 – We have been made aware that file transfers using the left-hand file browser are no longer working for users located on-campus using the latest version of MobaXterm (v22.1). Previous versions, e.g. v22.0 are still known to work, as are later versions. If you are still using v22.1, please install a later version.
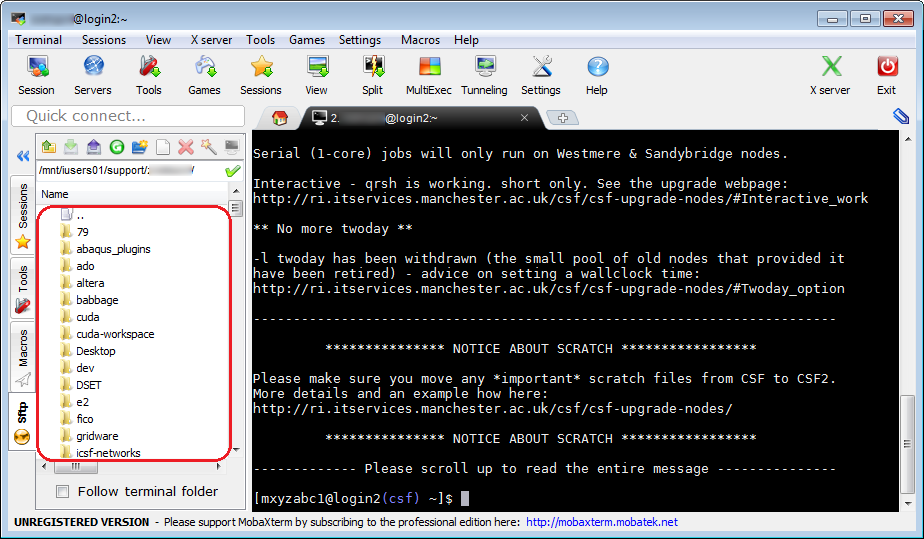
The panel on the left in the MobaXterm window allows files to be transferred between your PC and the CIR system simply by dragging and dropping files.
First, log in to the CIR system you wish to transfer files to/from. Do this in the black terminal window in MobaXterm. You will then be able to drag files to the file-browser window.
Method 2: WinSCP
WinSCP allows files to be transferred to and from the CSF using a drag-n-drop interface. WinSCP is already installed on most University windows PCs/laptops. If you cannot find in you can download and install it from the WinSCP website.
We’ll set up a CSF session in WinSCP so you only need to type the settings in once:
- Start the WinSCP program from the Start menu.
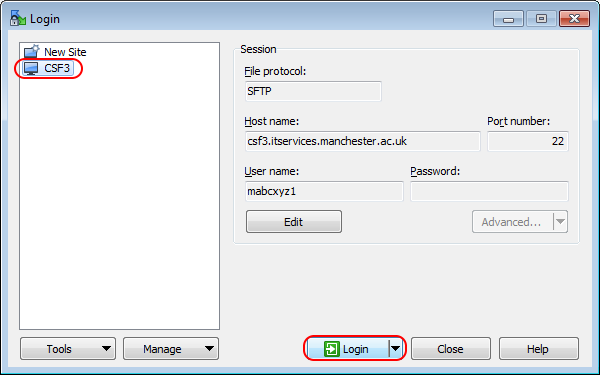
- If you’ve already done the following step, jump to Step 4. Otherwise fill in the details as shown below:
- Host name: csf3.itservices.manchester.ac.uk
- User name: your University IT username
- Password: your IT password
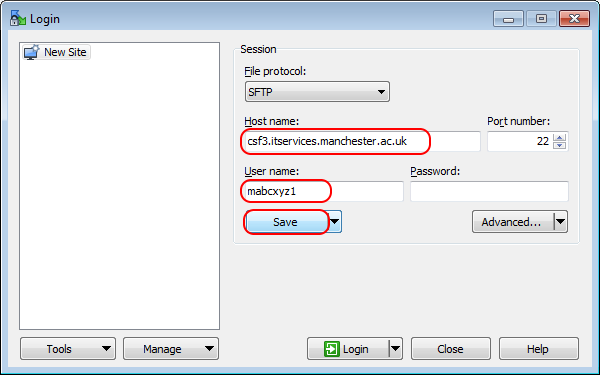
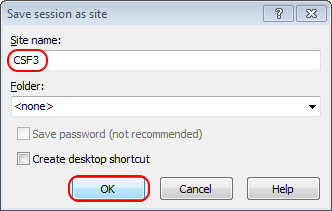
- Hit Save to create a saved session (give it a name)
- Highlight the CSF session and hit Login. Enter your password when asked.
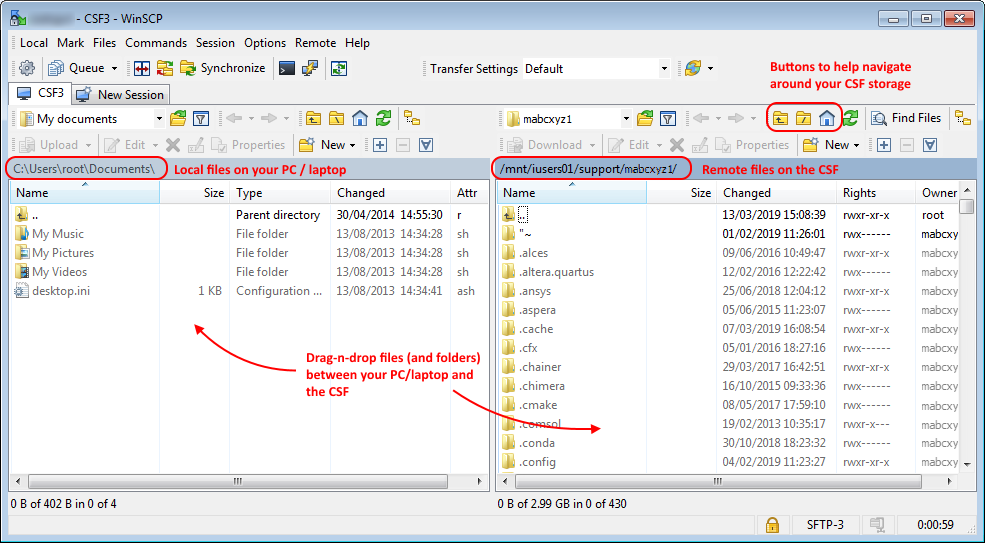
- You can now drag-n-drop files between the two systems. Your local PC is on the left, the CSF on the right.
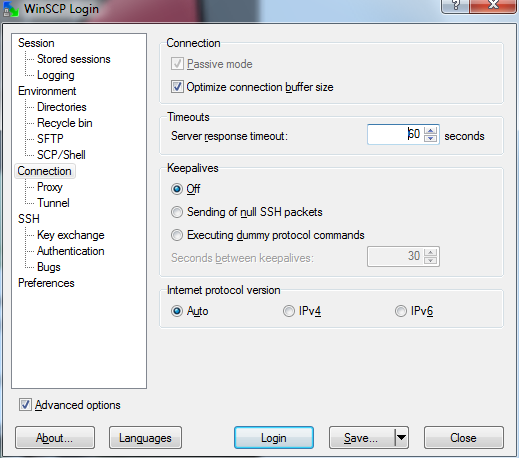
iCSF users – you may need to increase the timeout period in WinSCP
The login mechanism of iCSF checks the load on all the compute servers to choose one that is not heavily loaded. As a result you may get a ‘connection timeout’ message. We recommend that you increase the timeout period in WinSCP by ticking Advanced Options an then selecting Connection and increasing the Timeouts: Server response timeout to 60 secs.
rsync To/from a Linux computer or a mac computer or using MobaXterm
The rsync command is used to transfer files securely and efficiently between your PC/laptop and CSF. No installation is usually needed on Linux or Mac systems (it is there by default). It is also available in Mobaxterm (Windows) when you start a local terminal (instead of the usual remote connection to the CSF).
Rsync has some nice features for resuming interrupted transfers (no need to transfer everything again) and can be used to keep folders on your PC and the CSF in-sync – i.e., it can detect which files are new or have changed and only copy those.
Below examples assume that you have opened a terminal at your local machine and that you have changed to the local directory where you want to transfer files to/from (in MobaXterm specifically you may have to navigate to /drives/c/Users/your-user-name to find your user’s local files). The commands are run on your PC/laptop, NOT the CSF. Please type them carefully (notice the : between the CSF address and the file or folder names after it).
- Upload a file from your local machine to your CSF home directory (the
~at the end is short-hand for your CSF home folder)rsync -avz myinput.dat username@csf3.itservices.manchester.ac.uk:~
- Upload a file from your local machine to your CSF scratch directory
rsync -avz myinput.dat username@csf3.itservices.manchester.ac.uk:~/scratch/
- Download a file from your CSF home directory to your local machine (don’t forget the
.at the end to mean the current folder on your PC)rsync -avz username@csf3.itservices.manchester.ac.uk:~/myresult.dat .
- Download a file from your CSF scratch directory to your local machine (don’t forget the
.at the end to mean the current folder on your PC)rsync -avz username@csf3.itservices.manchester.ac.uk:~/scratch/myresult.dat .
- Download an entire directory from your CSF scratch area to your local machine (don’t forget the
.at the end to mean the current folder on your PC)rsync -avz username@csf3.itservices.manchester.ac.uk:~/scratch/results_dir .
!!Caution!!: Do NOT put a
/at the end of directory names as it changes the behaviour of rsync and may not do quite what you expect.
The -avz flag on the rsync command will run it in archive mode (it will transfer all files in a folder if a folder name is given instead of a filename and it will preserve the timestamps on files), it will be verbose (displaying filenames as it transfers them) and it will compress traffic to try to reduce the transfer time (files will be compressed before transfer and decompressed when received). Please check the rsync documentation using man rsync on your system.
Copying Large Files From/To the compute systems
Transferring large files (e.g., datasets, results of simulations – 100s GBs) via the compute system login node can slow down the login node. This affects other users on the system who will be using the login node to submit jobs, write jobscripts etc.
We now provide a dedicated server, named rds-ssh which also has access to your home directory and any research group shared areas. You can transfer large files for use on the from/to the rds-ssh server instead of the compute system login node – they both see the same files and directories.
Please note that rds-ssh cannot be used to access your scratch area.
Further details on using the rds-ssh server are available at the RDS-SSH documentation page.
Mount/Map Your Home, Scratch or CSF RDS Directory on Your Desktop or Laptop
Compute system users can easily make their home-directory available on their desktops using sshfs. This makes remote filesystems available using ssh and allows you to see your home directory as though it were a directory on your desktop. You can then copy files between the compute system and your desktop easily.
sshfs on Linux
On your Linux desktop machine ensure you have the fuse-sshfs package installed (the actual name may vary between Linux distros) then do:
mkdir csf
  #
  # make a directory to use as an access point for your CSF home-directory

sshfs username@csf3.itservices.manchester.ac.uk: csf \
       -o delay_connect \
       -o reconnect \
       -o ServerAliveInterval=15 \
       -o ConnectTimeout=10
  ^
  # mount your CSF home-dir by using sshfs
  #    --  replace username with your own
  #

ls csf
  #
  # Run Linux file/directory commands on the csf directory as usual
Your ~/scratch sym-link will not work via the SSHFS. You will need to set that up in a similar way to above specifying the absolute path to it:
mkdir csf_scratch
  #
  # make a directory to use as an access point for your CSF scratch directory

sshfs username@csf3.itservices.manchester.ac.uk:/scratch/username  csf_scratch \
       -o delay_connect \
       -o reconnect \
       -o ServerAliveInterval=15 \
       -o ConnectTimeout=10
  ^
  #
  # mount your CSF scratch-dir by using sshfs
  #    -- replace username in both places
  #


ls csf_scratch
  #
  # view your CSF scratch files as usual...
To unmount the CSF directories:
fusermount -u csf
fusermount -u csf_scratch
sshfs on MAC
Install macFUSE (earlier known as FUSE for OS X) and the associated SSHFS from the macFUSE website.
NOTE: You will need Admin access in your Mac Laptop to install these, and will need to change some system settings.
Follow the same instructions for sshfs on Linux shown above to mount your compute system directories on your Mac.
If you are trying to mount / view a location where you have group ownership only (often RDS), you may get “permission denied”.
In such a case, try:
sshfs -o defer_permissions [rest of command]
More info here.
To unmount compute system directories use the eject option or:
umount csf
sshfs on Windows
The method described below replaces previous use of Win-SSHFS and the Dokan Library (which we found to be unreliable on Windows 10).
The new method uses a couple of packages from the SSHFS-Win project. Yes, the name is very similar to previously used Win-SSHFS but it is a different package and works well on Windows7 and Windows10.
Please download and install the following two packages (both are required). You will need Administrator access to your PC to install these:
- The latest installer of WinFSP AND SSHFS-Win (both packages are required – see follow the instructions on that page.)
(if you have older versions installed you will need to uninstall them both before installing the latest versions).
If you don’t have Administrator access to your office PC, please download the packages and then contact the Support Centre to ask for this to be done. Please note that Research IT cannot install this for you.
The above two packages install some libraries in to your Windows installation. But they do not install any applications you actually need to run. They allow the mapping your RDS storage (e.g., your CSF home directory) to a drive (e.g., Z:) to be done using the usual map network drive method in Windows, as shown below.
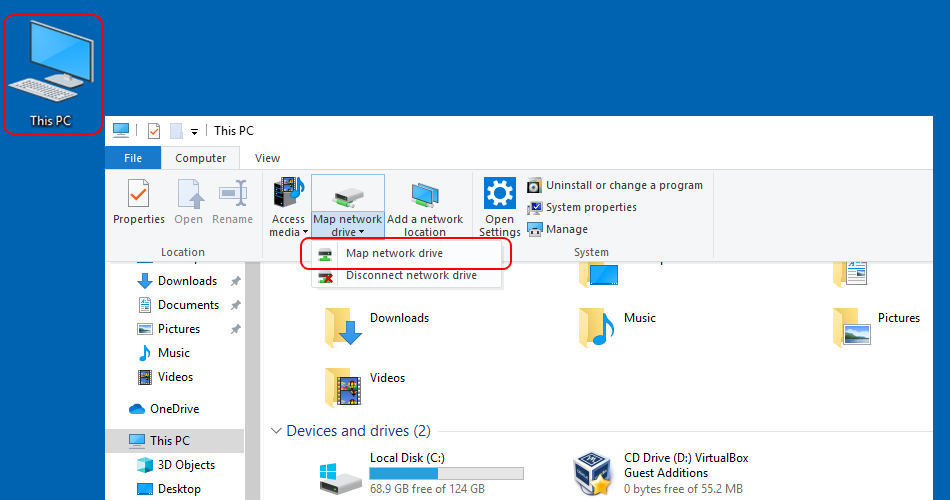
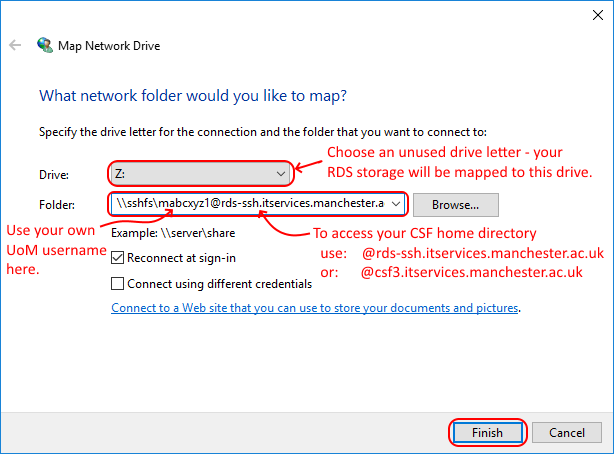
- On Windows 10, open This PC and select Map Network Drive:
- Choose a free drive letter (e.g., Z:) and enter the details of the remote system and storage area on that system that you wish to access in to the Folder option of the map network drive window. More details on how to map different areas of storage, such as additional RDS area and your CSF scratch, area are given below.To map your CSF home directory as a drive you must use the
\\sshfs\keyword in the details of the remote system. This makes any PATH supplied at the end of the hostname relative to your CSF home directory (so you don’t need to know what your CSF home directory PATH actually is!).Enter the following address in the Folder option of the map network drive window:- If on-campus your CSF home directory can be accessed using:
\\sshfs\username@csf3.itservices.manchester.ac.uk -o delay_connect,reconnect,ServerAliveInterval=15,ConnectTimeout=10 - If on or off campus, your CSF home directory can be access using:
\\sshfs\username@rds-ssh.itservices.manchester.ac.uk -o delay_connect,reconnect,ServerAliveInterval=15,ConnectTimeout=10
To map your CSF scratch directory as a drive you must use the
\\sshfs.r\keyword in the details of the remote system. This makes any PATH supplied at the end of the hostname begin at the root of the host’s storage. This means that you can specify the full path to your CSF scratch area:- You must be on-campus to access your CSF scratch directory. It is local to the CSF and only visible on the CSF. You cannot see your scratch area on the rds-ssh server. Enter the following address in the Folder option of the map network drive window:
\\sshfs.r\username@csf3.itservices.manchester.ac.uk\scratch\username -o delay_connect,reconnect,ServerAliveInterval=15,ConnectTimeout=10where username is your CSF username. Note that the username is used twice – at the start (before the @) to log in to the CSF and at the end as part of the PATH:\scratch\username
To map another area of Research Data Storage as a drive you must use the
\\sshfs.r\keyword in the details of the remote system. This makes any PATH supplied at the end of the hostname begin at the root of the host’s storage. This means that you can specify the full path to your extra RDS area. Enter the following address in the Folder option of the map network drive window:- If on-campus your RDS storage area can be accessed using using:
\\sshfs.r\username@csf3.itservices.manchester.ac.uk\mnt\fac01-rds\Project-Name -o delay_connect,reconnect,ServerAliveInterval=15,ConnectTimeout=10(for example, if you are in the BMH faculty, the path may be something like\mnt\bmh01-rds\XYZ-Project) - If on or off campus, your RDS area can be accessed using:
\\sshfs.r\username@rds-ssh.itservices.manchester.ac.uk\mnt\fac01-rds\Project-Name -o delay_connect,reconnect,ServerAliveInterval=15,ConnectTimeout=10
In all of the above cases the
usernameshould be your central IT username.
- If on-campus your CSF home directory can be accessed using:
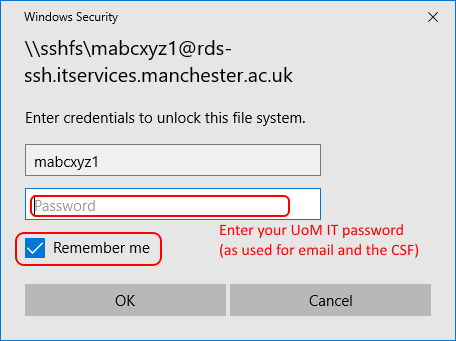
- You will be asked for your CSF password – this is the password you use to log in to the CSF – the same as used for services like GlobalProtect.
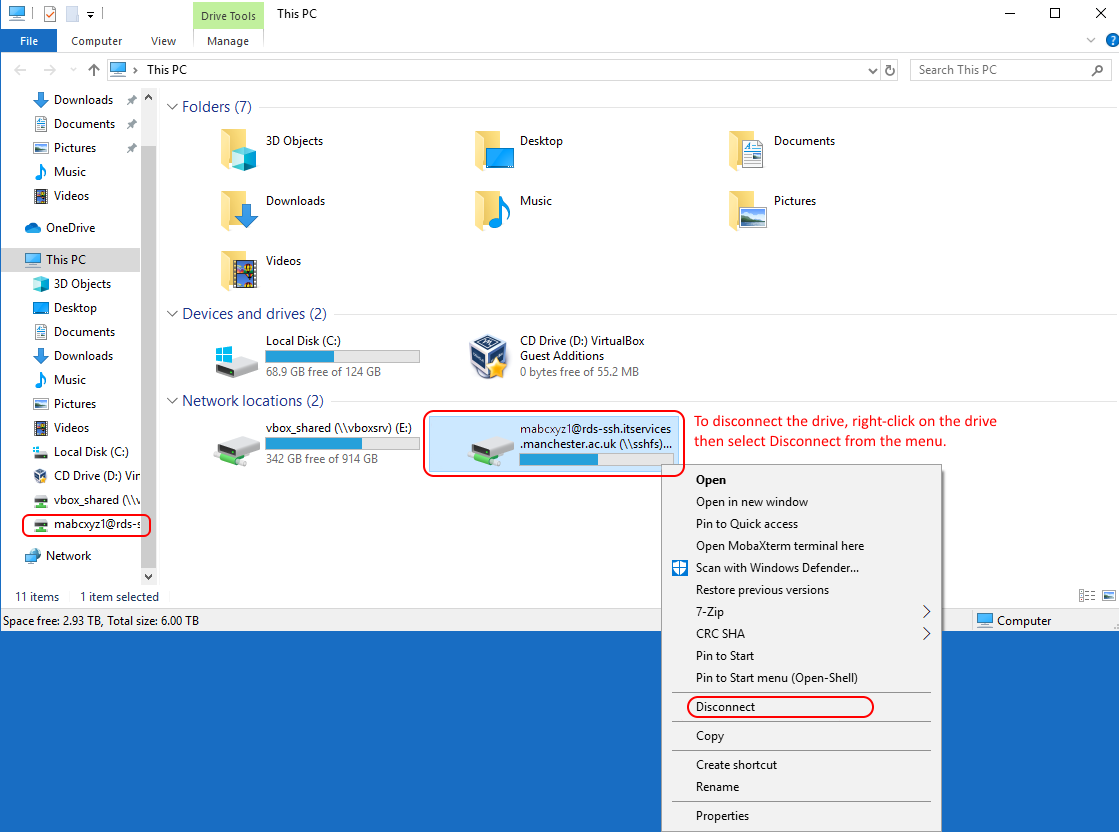
You can now navigate to your mapped drive letter and transfer files between your local PC and the remote storage.
If you wish to disconnect from the remote system, right-click on the drive letter in This PC and then select Disconnect from the menu: