
PyCharm
Overview
PyCharm is an integrated development environment (IDE) for data science and & web development and is used for programming in Python. It provides code analysis, a graphical debugger, an integrated unit tester, integration with version control systems.There is a Full-fledged Professional version and Free Community version.
PyCharm is written in Java and Python and comes bundled with Java.
PyCharm is not installed on the CSF. Instead, you will connect PyCharm installed on your PC/laptop to a Python Interpreter installed on the CSF.
Research IT DO NOT provide licenses.
This has been tested with PyCharm Professional version 2024.1.1 running on a PC/laptop with Windows 10/11, Ubuntu 22.04 and Xubuntu 22.04. It should work in other operating systems as well but we are unable to debug problems you your PC/latop – please contact the the main IT Helpdesk for help with that.
Restrictions on use
Please ensure you comply with the PyCharm licensing requirements on your PC/laptop. While the Community edition is free to use for personal and commercial development, licensed under Apache 2.0, the full featured Professional Edition needs commercial license to be purchased.
This page discusses running PyCharm in your Laptop/Mac/PC and connecting it to CSF3.
Set up overview
- PyCharm must be installed on your PC/laptop first, and a project created. You do not install/run PyCharm on the CSF.
- You will then run Python on the CSF to act as the “SSH Remote Interpreter” to which PyCharm (running on your PC/laptop) will connect. If your wish to use specific Python virtual environment on the CSF3, it can be activated on the CSF so that PyCharm uses that virtual env.
- The project folder configured on your PC/laptop gets automatically synced to a respective project folder on the CSF, once the above setup is complete.
- If a Python code is run in the PyCharm IDE at this stage, it will be executed on the login node of the CSF3, which is NOT permitted. Instead, the codes must be submitted as job to the CSF3 batch system, which will then run the code in the usual manner – on a suitable compute node. This is done by the
Python_Submit.pygiven below.You must copy the script to your project folder and open it in PyCharm. ThePython_Submit.pyfile must then be edited to describe your job (e.g., number of CPU cores, high memory, GPUs) and then run in PyCharm IDE. This will submit your project’s python code as a job. Theqstatcommand will also be run to show your job queue, all from within PyCharm. - You can then use the terminal provided in PyCharm IDE, or a separate terminal, to ssh to CSF3 as normal, and monitor the submitted job and analyse the output.
Connect PyCharm installed on PC/laptop to a Python Interpreter on the CSF
Start PyCharm Professional on your Laptop/Mac/PC, then open your project (or create a new one.)
If you haven’t created a project yet, create one first.
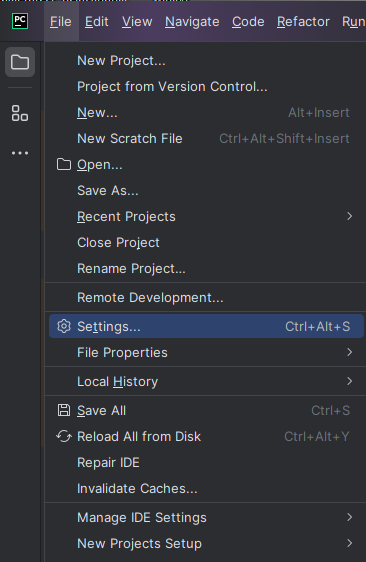
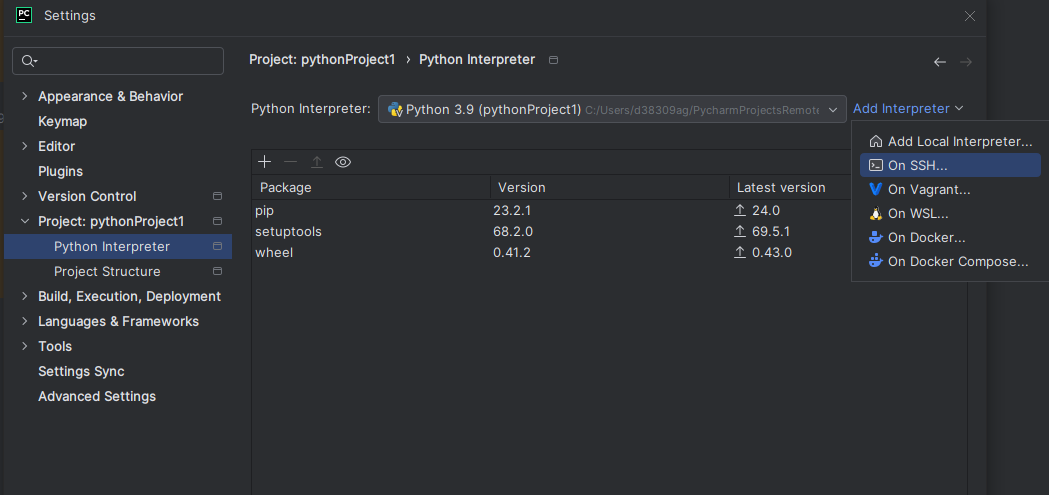
Then, go to:
File > Settings
Project > Python Interpreter
Add Interpreter > On SSH
(see images below)
Select New and type in:
Host: csf3.itservices.manchester.ac.uk
Port: 22
Username: your-csf3-username
(see image below)
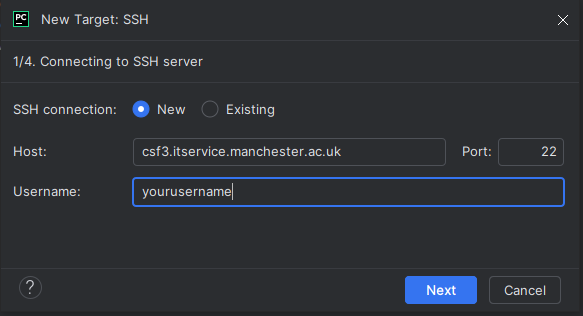
Then hit Next:
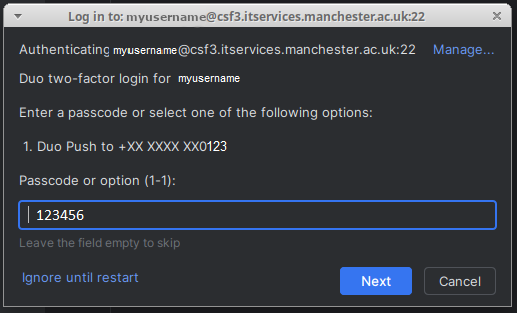
Type your password in the Password field and hit Next in the next step.
At the Duo two-factor login open your Duo app and then in your University of Manchester account click Show passcode and hit Refresh passcode.
DO NOT type 1 and hit enter to confirm from Duo. This method will not work. View and type the Passcode instead.
Type the refreshed passcode in the Passcode field and hit Next.
Even if it fails for the first time, try again.
You might need to type in your password and passcode twice.
After successful connection you may see something like this:
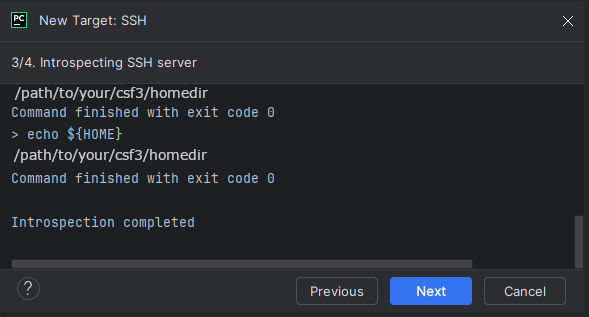
If you do not see the above messages, don’t worry, the connection is most probably established when the Next button turns to blue colour.
Hit Next.
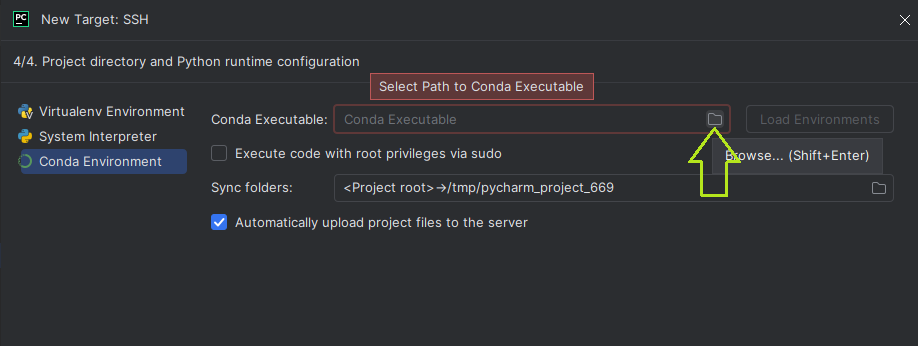
In the next stage (4/4), if you have created a conda environment on the CSF that you wish to use, select Conda Environment in the left panel.
Here you have the option for selecting other virtual environments as well.
Give it some time to search and then click on the small folder icon in the Conda Executable field.
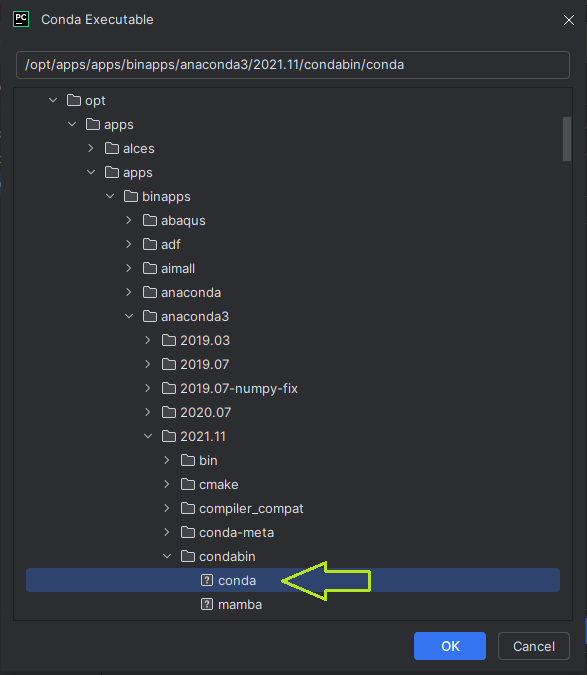
Now browse and select the Conda Executable in CSF3.
TIP:
To find the path of the Conda Executable of your environment, do something like the following in a MobaXterm/SSH terminal connected to the CSF:
module load apps/binapps/anaconda3/2021.11
source activate my_conda_env
which conda
This will show the path of the conda executable which you need to browse to and select.
For example:
/opt/apps/apps/binapps/anaconda3/2021.11/condabin/conda
It might be different for your conda version and environment.
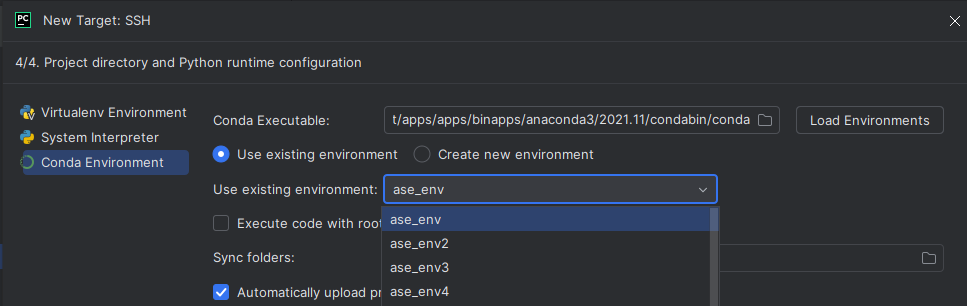
Now hit the Load Environments button on the right of Conda Executable field.
You will be able to see all of the conda environments that you have created on the CSF under: Use existing environment
From the list, select the one that you need.
Then click on the small folder icon at the end of Sync folders field.
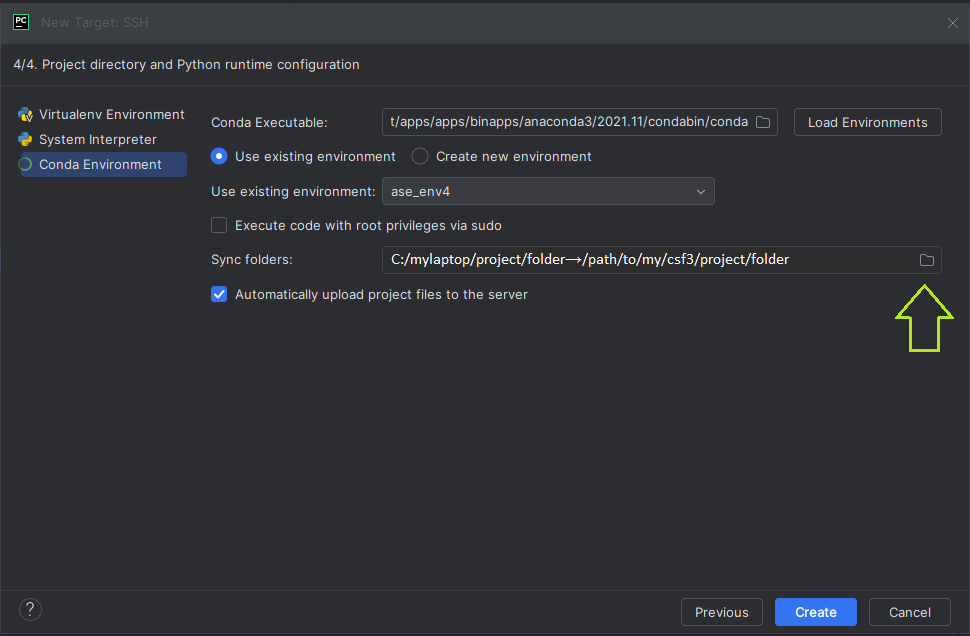
In the new window that pops up, set the path to your CSF3 folder where you want to keep your project files on CSF3 synced. For example, you may wish to store your sync’d projects in ~/pycharm_projects/my_project_1/.
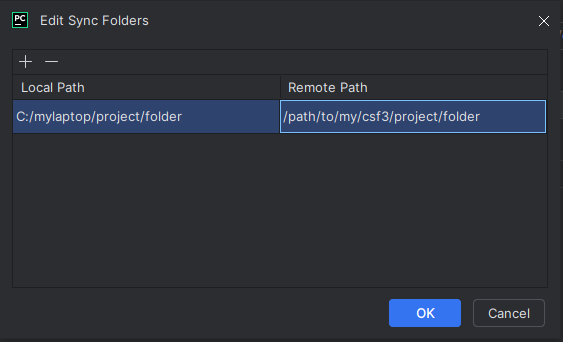
Next hit OK
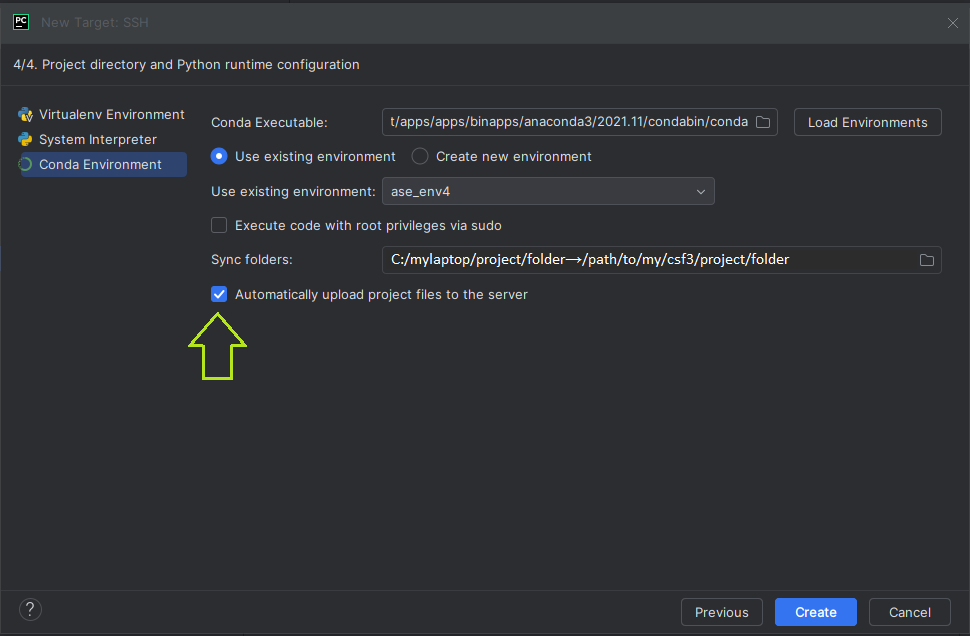
Keep Automatically upload project files to the server checked on, and hit Create.
Setup is now complete!
At this stage whenever you create new files, it gets saved locally on your PC/laptop project folder and also gets synced/uploaded to the CSF project folder.
The Python_Submit.py code
Instead, we will use a helper Python script to run your python code via the batch system. The Python_Submit.py script below will do this for you, but you will need to edit the file. You can use a new copy of this script in each PyCharm project. That way, projects can request different CSF resources (e.g., one project may require a GPU node, while another project may need a high-memory node.)
When you run the Python_Submit.py script in the PyCharm IDE, it will create a jobscript (to run your python project code) and submit that jobscript to the CSF3 batch system.
It will then display the squeue output to show your job queue.
Save a copy and Edit the Python_Submit.py script
You should download Python_Submit.py from here or cut-n-paste a copy of the code below in to a file named
Python_Submit.py in your project directory (remember that when you create this file on your PC/laptop in your PyCharm project, PyCharm will upload it to the CSF folder that contains a sync’d copy of your project files.)
The editable parameters of the script must be modified by you to suit your requirements -e.g., whether you need more cores, or a high memory node or a GPU node. The editable parameters have comments added for ease of understanding.
### OCT 2025: updated to be compatible with the upgraded SLURM batch system

import os

## Do not remove any of the quotes " " (for single-line strings) or """ """ (for multi-line strings)

# EDIT ME: Give the name for your jobscript file here
jobscript = "MyPyCharmJob"

# EDIT ME: Give the maximum wallclock time that your job will be allowed to run for
# Use the SLURM format d-hh:mm:ss (days-hours:minutes:seconds) OR d-hh OR mm
# WITH Double Quotes in all cases
wallclock = "4-00:00:00"

# EDIT ME: Give the name of the SLURM partition where the script will run
# (OCT2025) Available options including the double-quotes: "serial", "multicore",
# "multicore_small", "himem", "vhimem", "gpuA", "gpuL" and "gpuA40GB"
partition = "multicore"

# EDIT ME: Specify no. of cores (WITHOUT double-quotes) required for your job
cores = 2

# EDIT ME: Only if  himem and vhimem partitions chosen
# Write the amount of memory requested in Gigabytes (WITHOUT double-quotes)
# Ignored if the partition is not a GPU partition
mem = 1000

# EDIT ME: GPU jobs only (gpuL or gpuA partition chosen)
# Number of GPUs requested. Ignored if the partition is not a GPU partition
gpus = 1

# EDIT ME: Load necessary Anaconda module and any others you require
# Do not remove any of the multi-line string quotes """ """.
module_command = """
module purge
module load apps/binapps/anaconda3/2024.10
"""

# EDIT ME: Set to True if your python code uses OpenMP for multithreading
# It will set the environment variable OMP_NUM_THREADS=$SLURM_NTASKS
# Available options: True or False (without quotes, First Letter Capital)
openMP = True

# EDIT ME: Activate your conda environment (set to "" to ignore conda environments)
conda_command = "source activate my_conda_env"

# EDIT ME: The command to run your Python code goes here:
# (ensure you have saved your python code in the working/project directory)
python_command = "python MyPythonCode.py"

# De-activate conda environment after python code has completed running (set to "" to ignore conda environments)
conda_deactivate_command = "source deactivate"

################################################################################
# DO NOT EDIT BEYOND THIS LINE #################################################
################################################################################

print('Submitting ' + jobscript + '...')

pwd = os.getcwd()

# Jobscript file starts
job_sh = '#!/bin/bash --login' + '\n'
job_sh += '#SBATCH -J ' + jobscript + '\n'
job_sh += '#SBATCH -t ' + wallclock + '\n'
job_sh += '#SBATCH -p ' + partition + '\n'

if partition != 'serial':
    job_sh += '#SBATCH -n ' + str(cores) + '\n'

if (partition == 'himem') or (partition == 'vhimem') and (mem > 0):
    job_sh += '#SBATCH --mem=' + str(mem) + 'G\n'
elif (partition == 'gpuA') or (partition == 'gpuL') or (partition == 'gpuA40GB') and (gpus > 0):
    job_sh += '#SBATCH -G ' + str(gpus) + '\n'

# if present, add module load command
if module_command != '':
    job_sh += module_command + '\n'

# Help to ensure correct number of OpenMP cores used
if openMP:
    job_sh += '\n' + 'export OMP_NUM_THREADS=$SLURM_NTASKS' + '\n'

# if present, activate requested conda environment
if conda_command != '':
    job_sh += conda_command + '\n'

# if present, add Python code execution command
if python_command != '':
    job_sh += '\n' + python_command + '\n'

# if present, de-activate conda environment after execution of Python code
if conda_deactivate_command != '':
    job_sh += '\n' + conda_deactivate_command + '\n'

# Print job related useful info to output file
job_sh += """printf "$JOB_ID\\n"
hostname
date
"""
##################################################################
# Save jobscript and submit to batch
##################################################################
# write jobscript to a file in the PWD
job_filename = os.path.join(pwd, jobscript + '.sbatch')
with open(job_filename, 'w') as job_file:
    job_file.write(job_sh)

job_submitted = os.system('sbatch ' + job_filename)
if job_submitted == 0:
    print('Job submitted to the CSF3 SLURM batch system. Here is the summary of your submitted jobs:')
    os.system('squeue --me')
else:
    print('Failed to submit job!')
Further info
- Next time you start PyCharm after closing it or restarting laptop/Mac/PC, you will have to authenticate again using password and passcode
- PyCharm Website/
Updates
None.