
The RDS-SSH Service
Overview
The RDS-SSH server allows you to see both types of storage offered by the Research Data Storage (RDS) Service, in one place.
Two Types of Storage
The Research Data Storage (RDS) Service offers two different types of storage shares to researchers:
- Most commonly, RDS shares are just like an IT Services P-drive, i.e., a MS Windows-style “SMB” share which is only accessible on a desktop PC or laptop.
- Linux-style “NFS” shares are also available but are only accessible on the central compute platforms (CSF, iCSF) for security reasons. If you have been given access to extra storage areas on the CSF, for example, then it will be an “NFS” share.
All users of the CSF / iCSF will have a home directory on those systems. This is also “NFS” storage.
Some users require both types of storage and so it would be convenient to be able to see both types of storage in the same place. For example, to copy files between the desktop-accessible storage and the CSF/iCSF-accessible storage. The RDS-SSH service makes this possible!
When requesting a new storage allocation, please indicate which type of storage you need – SMB (for desktops/laptops) or NFS (for use on the CSF/iCSF). We will need this information from you before we can allocate storage. How to decide?
- If your know only want the storage for your laptop and, for example, your lab PCs, please request SMB storage.
- If you are a CSF/iCSF user and want extra storage on those HPC platforms, please request NFS storage.
- If you use lab PCs and want to share data within your lab and then upload it to the CSF for processing, you might need 50/50 allocation of SMB and NFS storage. Please indicate if this might match your situation.
We can discuss further with you which type of storage best suits your requirements. But indicating your preference in your storage request will speed up the allocation of your storage.
What do I use the rds-ssh system for?
You can log in to the rds-ssh server and access your “CIFS” (desktop) research data storage and your “NFS” (CSF/iCSF) research data storage at a Linux command-line. Copying files between the two types of storage on the rds-ssh server is fast.
As noted above, the “NFS” (CSF/iCSF) storage is usually only visible on the CSF/iCSF, and it isn’t possible to mount that storage directly on your desktop PC / laptop. But there are 3rd-party applications that can be installed on Windows, Mac and Linux desktop/laptops to mount this storage via the rds-ssh server.
The rds-ssh server can also be used to upload / download large files to your “NFS” (CSF/iCSF) storage. This keeps large file-transfers away from the CSF login node, which is used by many users for other tasks.
Please note: For off-campus access to the rds-ssh server please read our dedicated guide (login required.)
Please read on for how to obtain an account on the rds-ssh server, how to log in, and how to access your various storage shares.
Getting an Account and Accessing the Service
To obtain an account on RDS-SSH, please contact us via our Connect Portal Form (select “Provide Access to Existing Storage” from the drop-down menu in the form and indicate in the text that you require an RDS-SSH account.
Please tell us if you need a particular Research Data Storage share (i.e., storage area) made available on the rds-ssh server. Note that all CSF / iCSF home storage areas are already visible on the rds-ssh server (and when you log in you’ll be in you CSF home directory, if you have a CSF account).
Login Details
Various methods of accessing the rds-ssh server are described below. In all cases you should use the following settings:
- Hostname:
rds-ssh.itservices.manchester.ac.uk - Username: your central IT Services username
- Password: your central IT Services password
The University VPN and GlobalProtect
When accessing on-campus resources such as the RDS-SSH service from off-campus you must be signed in to the University VPN, which can be accessed using the Global Protect software.
- University managed laptops already have the GlobalProtect software installed. You can also download it and run it on your home PC/laptop.
- If not already installed, please install the IT Services VPN Software (GlobalProtect) on your home PC/laptop.
How can you access your files? SSH, SCP, SFTP, SSHFS and rsync-over-SSH
By connecting to the RDS-SSH service, you can access your RDS shares using various tools and commands, such as SCP, SFTP, SSHFS and/or rsync-over-SSH and directly at the Linux command-line on the rds-ssh server/. For details of each, see below.
What can you use RDS-SSH for?
- Securely Access NFS and CIFS Shares
- Securely access both Linux-style NFS shares and MS-Windows style CIFS shares, from on and off campus, from your MS Windows, Mac OS-X or Linux desktop/laptop. We organise access to your shares on the rds-ssh server, you connect to it and can access the files in your shares.
- Copy Files Between Shares Efficiently
- Copying files from one share to another within the datacentre network, i.e., without the need for data to be transferred over the relatively slow campus network. So no more downloading to your desktop from one share only to upload to another (which can be very slow). Log in to the rds-ssh server and copy directly between the two shares, all within the fast network. See the FAQ entry for information on this particular operation.
- GUI-based Access to NFS (and CIFS) Shares
- NFS and CIFS shares can be seen as network drives in Windows Explorer, MacOSX Finder or Linux XFE browser. This allows familiar drag-n-drop file management from your desktop.
- Large-Scale Data Uploads/Downloads
- Uploading or downloading large amounts of data to CSF/iCSF/DPSF filesystems — such large transfers via the CSF/iCSF/Redqueen/Hydra login nodes is frowned upon as this slows down access to the login nodes for all users resulting in unhappy colleagues. The rds-ssh server is a dedicated box for exactly this type of transfer.
Logging in – Simple SSH or SCP Access
You can log in to the rds-ssh server using an ssh app to perform file management commands directly on the server. For example, this allows you to copy files between different shares directly on the server using the fast data-centre network.
You can transfer files to and from the rds-ssh server using a scp app (e.g., WinSCP on Windows or the scp command on linux). This is simple way of uploading files to your shares (e.g., to upload data ready for use on the CSF) or to transfer results back from your shares.
Follow the instructions below on how to use these methods of accessing your files.
Windows (Mobaxterm)
On Windows you can install MobaXTerm and/or WinSCP to transfer files to/from the rds-ssh server. Please follow the CSF MobaXTerm instructions and simply change any references to:
csf.itservices.manchester.ac.uk
to
rds-ssh.itservices.manchester.ac.uk
Off-campus
If logging in from off-campus you will first need to be connected to the University VPN (GlobalProtect) – You may already connect to the University VPN in order to access your email.
- University managed laptops already have the GlobalProtect software installed. You can also download it and run it on your home PC/laptop.
- If not already installed, please install the IT Services VPN Software (GlobalProtect) on your home PC/laptop.
- This facility is provided by IT Services (not Research IT). Requests for help with the VPN and/or GlobalProtect should be made to via the Support Portal.
On-campus
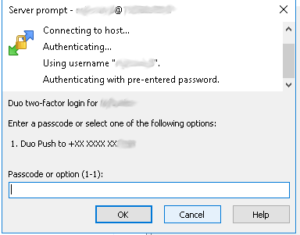
If on-campus and not connected to the University VPN you will need to authenticate using your 2FA device.
If you use the Duo mobile app as your 2FA device, Enter ‘1’ at the prompt and press Enter. Once the push notification has been received via the Duo mobile app ‘Approve’ the request in order to log on.
$ ssh username@rds-ssh.itservices.manchester.ac.uk
Password:
Enter a passcode or select one of the following options:

1. Duo Push to +XX XXXX XXX555

Passcode or option (1-1):1
OR
If you use a Duo fob as your 2FA device, generate a passcode with the fob, type the passcode at the prompt and press Enter
$ ssh username@rds-ssh.itservices.manchester.ac.uk
Password:
Duo two-factor login for username

Passcode: 123456
- You may be asked if you wish to save your password (see image below):

We strongly recommend you select No because saving passwords inside applications is a security risk. You tell MobaXterm to never save your passwords by ticking the box labelled ‘Do not show this message again’.
-
- After logging on via Mobaxterm, users may be asked to enter an SSH-Browser password (see below), you will have to re-authenticate via 2FA
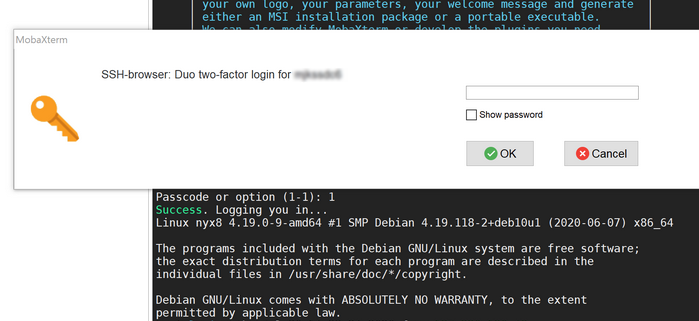
- If you use the Duo mobile app as your 2FA device, Enter ‘1’ at the prompt and press Enter. Once the push notification has been received via the Duo mobile app ‘Approve’ the request in order to log on.
- After logging on via Mobaxterm, users may be asked to enter an SSH-Browser password (see below), you will have to re-authenticate via 2FA
-
- If you use a Duo fob as your 2FA device, generate a passcode with the fob, type the passcode at the prompt and select OK.
Windows (WinSCP)
WinSCP is a graphical file transfer program which can be used to drag-n-drop files between your local desktop and the rds-ssh server. Please follow the CSF WinSCP instructions and simply change any references to:
csf.itservices.manchester.ac.uk
to
rds-ssh.itservices.manchester.ac.uk
Off-campus
If logging in from off-campus you will first need to be connected to the University VPN (GlobalProtect) – You may already connect to the University VPN in order to access your email.
- University managed laptops already have the GlobalProtect software installed. You can also download it and run it on your home PC/laptop.
- If not already installed, please install the IT Services VPN Software (GlobalProtect) on your home PC/laptop.
- This facility is provided by IT Services (not Research IT). Requests for help with the VPN and/or GlobalProtect should be made to via the Support Portal.
On-campus
If on-campus and not connected to the University VPN you will need to authenticate using your 2FA device.
WinSCP will present a dialogue box similar (see image below)
If you use the Duo mobile app as your 2FA device, Enter ‘1’ at the prompt and press Enter. Once the push notification has been received via the Duo mobile app ‘Approve’ the request in order to log on.
If you use a Duo fob as your 2FA device, generate a passcode with the fob, type the passcode at the prompt and press Enter
Linux / MacOS
From a linux or MacOS desktop/laptop SSH, SCP & RSYNC can be done at the command-line. For example, to SSH in to the rds-ssh server use:
ssh username@rds-ssh.itservices.manchester.ac.uk
Replace username with your central University username. Your password is your central IT Services password. You may then be presented with a 2FA stage.
Off-campus
If logging in from off-campus you will first need to be connected to the University VPN (GlobalProtect) – You may already connect to the University VPN in order to access your email.
- University managed laptops already have the GlobalProtect software installed. You can also download it and run it on your home PC/laptop.
- If not already installed, please install the IT Services VPN Software (GlobalProtect) on your home PC/laptop.
- This facility is provided by IT Services (not Research IT). Requests for help with the VPN and/or GlobalProtect should be made to via the Support Portal.
On-campus
If on-campus and not connected to the University VPN you will need to authenticate using your 2FA device.
If you use the Duo mobile app as your 2FA device, Enter ‘1’ at the prompt and press Enter. Once the push notification has been received via the Duo mobile app ‘Approve’ the request in order to log on.
$ ssh username@rds-ssh.itservices.manchester.ac.uk
Password:
Enter a passcode or select one of the following options:

1. Duo Push to +XX XXXX XXX555

Passcode or option (1-1):1
OR
If you use a Duo fob as your 2FA device, generate a passcode with the fob, type the passcode at the prompt and press Enter
$ ssh username@rds-ssh.itservices.manchester.ac.uk
Password:
Duo two-factor login for username

Passcode: 123456
You can then use linux command-line file management tools (such as mv, cp, rm, mkdir rmdir).
We have also provided the graphical file manager, XFE, on the rds-ssh server which will allow you to browse your files and to copy files between directories available on RDS-SSH. You cannot transfer files to your desktop with XFE.
SCP (or RSYNC)
SCP (or RSYNC) can be used from the linux or MacOS command-line (and MobaXterm command line) to transfer files between your local desktop/laptop and the rds-ssh server. For example:
# Example: transfer a file to the Isilon storage directory ~/data/experiment1
# (~ is shorthand for your home directory).
scp my-local-file.txt username@rds-ssh.itservices.manchester.ac.uk:~/data/experiment1/

# scp example transfer a file from your Isilon home directory to your local computer
# (notice the . at the end - shorthand for 'current local directory')
scp username@rds-ssh.itservices.manchester.ac.uk:~/run.log .

# Example: transfer a file to the Isilon storage directory ~/data/experiment1
# (~ is shorthand for your home directory).
rsync -avz my-local-file.txt username@rds-ssh.itservices.manchester.ac.uk:~/data/experiment1/

# rsync example of transferring a file from your Isilon  home directory
# (notice the . at the end - shorthand for 'current local directory')
rsync -avz username@rds-ssh.itservices.manchester.ac.uk:~/run.log .
SFTP
SFTP (secure file transfer protocol) is another method of transferring files to and from the rds-ssh server. It seems to be less frequently used on systems nowadays as apps such as WinSCP, MobaXTerm and the scp command have become more popular. However, if you have an SFTP program (e.g., FileZilla or FireFTP) then rds-ssh will accept SFTP connections. Note that non-secure (i.e., ordinary FTP) connections are not possible. You application will ask for the host to connect to – simply use:
rds-ssh.itservices.manchester.ac.uk
and supply your central IT Services username and password when prompted.
Use this method if you want an RDS share (e.g., your CSF/iCSF/Redqueen/Hydra home directory) to appear as a network drive on your desktop/laptop (in Windows or Linux/MacOS).
Note: Don’t be tempted to mount two different RDS shares (e.g., as drives E: and F:) and copy (or move) files from one to the other. This is slow because the files will be transfered via your desktop/laptop which could involve either the slower campus network, wi-fi (usually quite slow) or home broadband (uploading can be very slow). If you want to copy/move files between different RDS shares please see this FAQ entry for how to do it using only the fast network in the data-centre.
Using SSHFS from MS Windows
This will make your RDS share appear as a network drive in Windows, even if your RDS share is an NFS-share (normally only CIFS-shares can be mapped as network drives in Windows).
Please see our SSHFS On Windows documentation for full details.
Using SSHFS on Linux
- Install the sshfs package
- On a Debian or Ubuntu host, install the SSHFS client using the apt-get package manager:
apt-get install sshfs
- On Fedora, RedHat, or derivatives, download and install the
fuse-sshfsRPM from the EPEL repository:# First add epel to your repos then do: yum install fuse-sshfs
- On a Debian or Ubuntu host, install the SSHFS client using the apt-get package manager:
- Next, ensure any user of the linux host who wishes to use SSHFS is in the
fusegroup. For example, to add a user to the fuse group (you must have root privileges):usermod -a -G fuse username
The user should log out of the system and back in for this to take effect.
Once SSHFS is installed and configured, as above, make a directory to use as a mount point:
mkdir my-rds-share
Next mount your share
sshfs  mpqrxyz2@rds-ssh.itservices.manchester.ac.uk:/mnt/iusers01/support/mpqrxyz2 my-rds-share
    # ...enter your IT Services password when prompted...
    # ...if on-campus you will need to authenticate via duo ...
On campus
Enter a passcode or select one of the following options:

1. Duo Push to +XX XXXX XXX555

Passcode or option (1-1):1
OR
If you use a Duo fob as your 2FA device, generate a passcode with the fob, type the passcode at the prompt and press Enter
Duo two-factor login for username
Passcode: 123456
Once you no longer need your share mounted, unmount it like this:
fusermount -u my-rds-share
SSHFS Options on Linux
These are set within /etc/fuse.conf:
- user_allow_other
- If this appears (uncommented), then users may specify the
allow_otheroption when mounting a filesystem via SSHFS, e.g.,sshfs -o allow_other mpqrxyz2@rds-ssh.itservices.manchester.ac.uk my-rds-share
which means that other users on your Linux host can access may access the filesystem.
Using SSHFS from MacOS-X
You will need to download and install macFUSE then SSHFS from macfuse.io. There are further installation notes for macFUSE and installation notes for SSHFS on that site’s Wiki.
Once the software is installed, you can then use SSHFS from a BASH command-line, exactly as above, for Linux, to mount a RDS share on your Mac — once mounted the volume will appear as an icon on your desktop.
To unmount the volume, simply right-click on the icon and select Eject.
UKBioBank / EGA Download Tools
A number of download tools from the UK BioBank and European Genome Archive (EGA) are available on the RDS-SSH servers. These are automatically in your PATH upon login – simply login and run the commands you would normally run. If the command requires a keyfile, ensure you have copied the key file to your home directory. For example:
ukbfetch -e123456 -d6789_1_0 -ak12345.key
The following UKBioBank download tools are installed – please do not download your own version, it may not work. You can simply run these commands at the prompt once you’ve logged in to rds-ssh.itservices.manchester.ac.uk:
ukbmd5        # Calculate size and MD5 of a file
ukbconv       # Convert unpacked UKB data to other formats
ukbunpack     # Unpack (decrypt and decompress) UKB data
ukbfetch      # The bulk data download tool
ukblink       # Download Returned-datasets and link between Applications
ukbgene       # Download approved genetic data. This tool supersedes a tool named gfetch.
For more information on how to run these commands, please see http://biobank.ndph.ox.ac.uk/showcase/download.cgi. Follow the links for each tool – this will take you through to a description of the tool where you can also access the user-guide.
Other download tools are also installed. The links below will take you to the instructions for each tool, provided by the authors of the software.
egaclient(this will automatically load theEgaDemoClient.jarfile) andegacryptor– EgaDemoClient download client (java downloader and file decrypter)ascp(uses the default aspera keyfile) andascp_noid(you should add the-i PRIVATE-KEY-FILEflags) – Aspera download client (Linux command-line downloader)basemountIllumina BaseSpace command-line tools – Illumina Basemount