Overview
IPython Notebook is a web-based interactive computational environment where you can combine code execution, text, mathematics, plots and rich media into a single document. We execute python commands and view the results in a web browser. The python commands execute remotely on the iCSF (where more memory and compute-power exists).
IPython version 1.1.0 is installed on the iCSF as part of the Anaconda Python 1.9.2 package. This runs Python 2.7.
Restrictions on use
There are no restrictions accessing this software. However you must have an account on the nyx3 or nyx4 virtual desktop server from which you then access the iCSF. Please see X2GO virtual desktop for details. To request an account on nyx3/nyx4 please email its-ri-team@manchester.ac.uk.
Set up procedure
The IPython Notebook software runs on one of the iCSF compute nodes. However, we do not manually log in to the iCSF and run the IPython Notebook software. Instead we run a script on the nyx3/nyx4 virtual desktop to manage the whole business of connecting to the iCSF and running the IPython software.
Hence you must first log in to the nyx3 or nyx4 virtual desktop service using the x2goclient software. See links for details.
(The RI Team are developing a method to allow you to do this direct from your desktop but for now we must use the nyx3/nyx4 virtual desktop).
Running the application
The following instructions assume you are logged in to the nyx3 virtual desktop (we use nyx3 in this example but you can also use nyx4).
Launching the IPython Notebook on to the iCSF
Note: we use nyx3 in this example but you can also use nyx4.
- On nyx3, open a shell window (e.g., using menu: Applications -> System Tools -> Terminal)
- In the terminal, run:
ipython-notebook # Add --highmem to use iCSF 256GB node
- Enter your iCSF password when prompted
- Make a note of the URL address given to you – e.g.:
http://localhost:7777 (the number at the end may differ).
This will log you in to the iCSF (incline) and start the IPython Notebook server. Hence you will be asked for your iCSF password. Enter it when prompted.
For example, the complete output is:
[mabcxyz1@nyx3 ~]$ ipython-notebook

===================== Use the URL given here ====================

 1. Enter your iCSF password when prompted below
 2. On nyx3 please start iceweasel and browse to:

           http://localhost:7777

Connecting to the iCSF to start an iPython Notebook...
mabcxyz1@incline's password: <enter your iCSF password>
You will have been automatically logged in to the iCSF (on to one of the backend nodes). Notice the URL advertised to you:
http://localhost:7777
The 7777 port number may be different in your output. You should make a note of the URL, particularly the port number. We will access this URL in a web browser shortly.
You will see some output from the IPython Notebook server and then the message:
======= ** IMPORTANT - YOU MUST DO THIS WHEN FINISHED WITH IPython ** =======

 Please use CTRL-C in this window to terminate iPython Notebook on incline01
 (PID 102924) ...
We will use this when shutting down the server at the end of our session (see below).
View the IPython Notebook in a Web Browser on nyx3
On the nyx3 virtual desktop:
- Start Iceweasel (e.g., using menu: Applications -> Internet -> Iceweasel)
- Now enter the following address in the browser address bar at the top:
http://localhost:7777
where 7777 is the number reported to you earlier when you ran ipython-notebook
You should now see the IPython Notebook dashboard in your web browser. This has connected to the iCSF backend node running the IPython Notebook:
Iceweasel should already have the settings needed to access the outside world via the University proxy (this is done for security). If you cannot access external websites, follow these instructions:
- In Iceweasel, select the three hotdogs menu on the right-hand side, then: Preferences
- Select icon: Advanced (cog icon in top row)
- Select tab: Network (middle of the 5 tabs)
- Press button: Settings… (top right of panel)
- Select radio button: Manual proxy configuration: (4th option)
- Fill in the boxes HTTP Proxy:
webproxy.its.manchester.ac.uk and Port: 3128
- Hit OK
- Close the Preferences panel
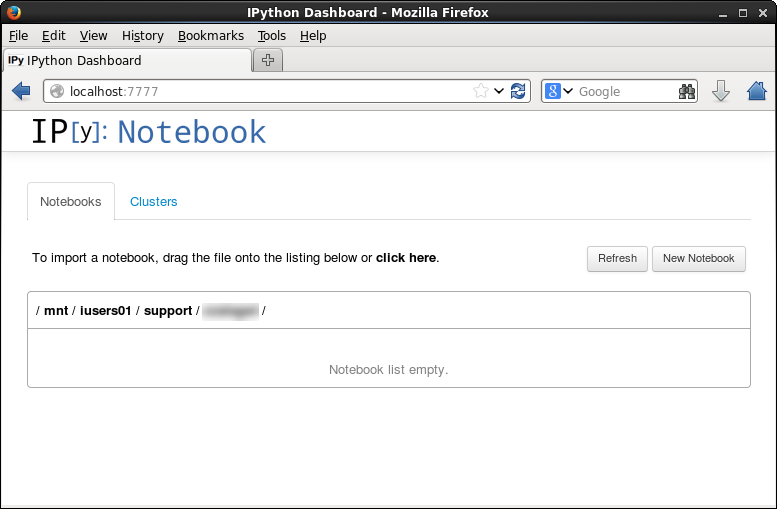
Create a new notebook in which you will run Python commands:
- Press New Notebook (right-hand side)
A new web browser tab will open giving you a notebook where you can type Python commands:
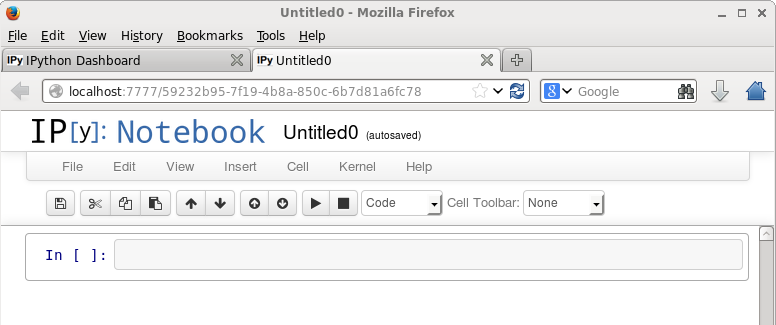
- After entering commands press the ‘play’ icon to execute them
- OR press Shift-Enter to execute commands immediately
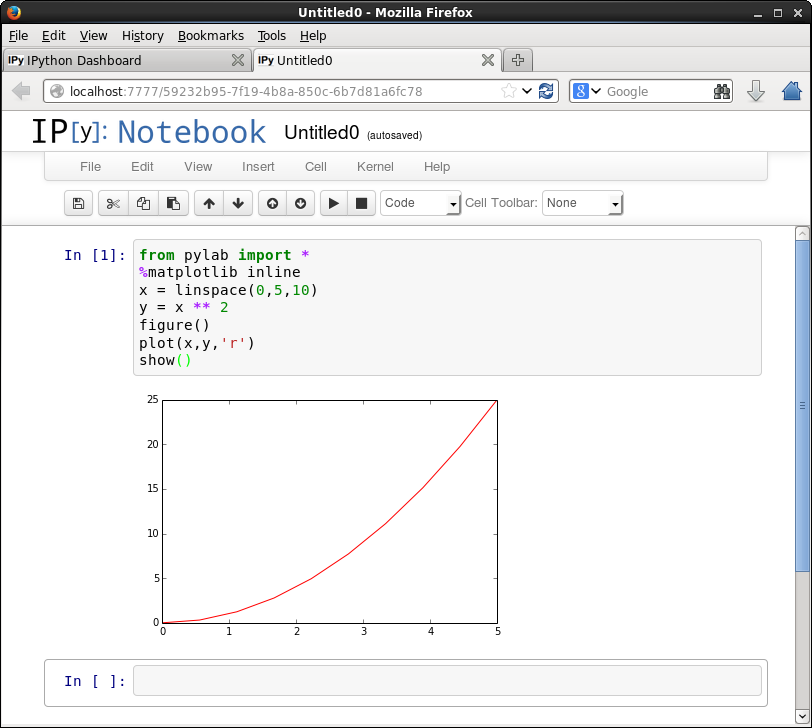
Try the following commands:
from pylab import *
%matplotlib inline
x = linspace(0,5,10)
y = x ** 2
figure()
plot(x,y,'r')
show()
  #
  # Press SHIFT-Enter to run this cell or press the play icon in the bar above
You should see the following:
Explore the menus in the Notebook to save notebooks, and Close and Halt the notebook when you are finished with it (a notebook could be executing a long-running python script – it is a live web-page, so you have to halt the notebook before it is closed. The menus do this in one command.)
Close the web browser when you are finished with the Notebook dashboard then proceed to the next section to stop the server (this is important!)
Stopping the Remote Notebook Server
As mentioned above, when you have finished using the IPython Notebook on the iCSF you must close it down. Otherwise server processes may be left running on the iCSF backend nodes.
Simply type CTRL-C in the shell window. It will report that it has shut down the server. You will be automatically logged out of the iCSF, leaving the shell window back at the nyx3 prompt.
======= ** IMPORTANT - YOU MUST DO THIS WHEN FINISHED WITH IPython ** =======
 Please use CTRL-C in this window to terminate iPython Notebook on incline01
 (PID 102924) ...

^C     <-- here we pressed CTRL-C
2014-07-11 12:45:06.483 [NotebookApp] CRITICAL | received signal 2, stopping
2014-07-11 12:45:06.484 [NotebookApp] CRITICAL | received signal 2, stopping
2014-07-14 12:10:41.508 [NotebookApp] Shutting down kernels

Terminated iPython Notebook on incline01 (PID 102924)

Connection to incline closed.

[mabcxyz1@nyx3 ~]$
That’s it, we’re back on nyx3 and the IPython Notebook server we were running on the iCSF has finished.
Additional Usage Notes and Hints
We’ll update this section with additional information and hints on using IPython Notebooks in response to user feedback. Please feel free to send us useful information via its-ri-team@manchester.ac.uk.
Magic Commands
In the sample code above some of the commands typed in to our first IPython Notebook began with a % character. This must be typed as part of the command (it isn’t a prompt as you might find in a command-shell). For example, earlier we used:
%matplotlib inline
to load the Matplotlib package, giving it a flag to have plots/figures displayed inline in the browser rather than popping up in a separate window.
These commands are known as magic commands. They provide additional functionality beyond that provided by Python. Commands that begin with a single % are called line magics and lines that begin with %% are call cell magics. Cell magics take all subsequent lines in a cell as input (line magics only use the arguments passed in on the same line).
Rmagic
IPython has an extension that contains magic functions for working with R via rpy2. This extension can be loaded using the %load_ext magic as follows:
%load_ext rpy2.ipython
Don’t forget to include the % symbol – it is part of the command! (Note that earlier versions of IPython used rmagic for the name of this magic instead of rpy2.ipython).
You can now issue R commands in your IPython Notebook. Try the following:
# If not already done above...
%load_ext rpy2.ipython

import numpy as np
import pylab
X = np.array([0,1,2,3,4])
Y = np.array([3,5,4,6,7])
pylab.scatter(X, Y)
%Rpush X Y
# Press SHIFT-Enter to run this cell or press the play icon in the bar above
Nothing will appear yet (we’ve just set up some variables for the next set of commands). In the next cell, type
%%R -i X,Y -o XYcoef
XYlm = lm(Y~X)
XYcoef = coef(XYlm)
print(summary(XYlm))
par(mfrow=c(2,2))
plot(XYlm)
# Press SHIFT-Enter to run this cell or press the play icon in the bar above
You should now see various statistics and four plots.
Please see the Rmagic documentation for details of these commands.
When you start the IPython Notebook server on the iCSF the R 3.1.0 modulefile will be automatically loaded so that you can use the Rmagic command (it requires access to an R installation).
Further info
Updates
None.
Last modified on March 22, 2019 at 5:21 pm by George Leaver