
How many cores should I use? Job Scaling
To display this old SGE page, click here
But we also want to know how much faster it goes with different numbers of cores. For example, if you double the number of cores, does the job complete in half the time? If you quadruple the number of cores, does the job complete in a quarter of the time, and so on.
The above scaling is called strong scaling – the problem size is kept the same size but you increase the number of cores. If doubling the number of cores reduces the wallclock time by half (and so on) then this is called ideal scaling.
Does my software scale?
Some factors which determine whether your software will scale:
- The parallel efficiency of the software: Is it a well-written, efficient application with little parallel communication overhead? You may not know the answer to this but checking the software’s documentation may give some details of how many cores the software can use and how scalable the software is. If the software developers recommend an upper limit on the number of cores to use then you should probably stick to that limit! If there are examples of the software being run on other large HPC systems then it is probably very scalable software.
- The algorithm your software is using. Even well-written software may be using an algorithm that doesn’t scale well. Again, you may not know this, but some applications, such as chemistry application which consider forces between atoms will scale better if only considering short-range forces. Switching on all of the calculations that an application can perform may reduce scalability. Only calculate what you actually need for your research.
- The size of your data (or the parameters you supply that may tune the algorithm). If you are using unnecessarily short time-steps in a simulation, or unnecessarily large systems to be solved then the application may not scale. Try to chose appropriate parameters for your software
Running some scaling tests
The best method to determine the number of cores to use is to run several jobs using the same dataset but with an increasing number of cores. You can then inspect the time the job took to complete (the wallclock time) and determine whether your application keeps going faster and faster as you increase the number of cores. This can be important if you have a lot of jobs to run (e.g., a lot of simulations to perform using different input datasets or different simulation parameters). Doing some early tests to find the best number of cores to use can save you time in the long-run.
For example, suppose you have a parallel application that can be run on multiple cores in a single compute node (i.e., up to 32 cores on CSF3). You can submit multiple jobs using the following method:
- Create a jobscript for a serial job (it uses only one core). For example:
#!/bin/bash --login
#$ -cwd
module load apps/intel-17.0/myapp/1.2.3        # Load the modulefile in the job

# Run the app using one core. The $NSLOTS variable is automatically set to the
# number of cores assigned to your job (1 for a serial job). The --numthreads flag
# will probably be called something else in your app - check the docs!
myapp --numthreads $NSLOTS -in mydata.dat -out myresults.$JOB_ID.dat
Submit the job using the usual
qsub myjobscript.qsubcommand. Make a note of the jobid assigned to your job (a number printed out by theqsubcommand). - When complete, get the wallclock time for the job using:
qacct -j jobid | grep wallclock
This will tell you how long the job took to run in seconds.
- Now repeat the job with an increasing number of cores. You do not need to edit the jobscript each time. Instead, supply the parallel environment name and number of cores on the
qsubcommand-line. We also ensure we use the same Intel CPU architecture for all jobs to make the timing comparison as fair as possible. It isn’t possible to run serial jobs on the Skylake nodes (the current newest architecture in CSF3) so we only do this for the parallel jobs:qsub -pe smp.pe 2 -l skylake myjobscript qsub -pe smp.pe 4 -l skylake myjobscript qsub -pe smp.pe 8 -l skylake myjobscript qsub -pe smp.pe 16 -l skylake myjobscript qsub -pe smp.pe 32 -l skylake myjobscript
The jobs will all be given a unique job id which you should make a note of.
- You can now query the job accounting information as before:
qacct -j jobid | grep wallclock
Suppose we get the following wallclock times for our job. We also calculate the speed-up using the formula
Speed-upNcores = Wallclock1core / WallclockNcores
and can also write down the ideal (linear) speed-up:
Cores   Wallclock(s)   Speed-up    Ideal (Linear) speed-up
1       725            1.0         1.0
2       367            1.9         2.0
4       181            4.0         4.0
8       93             7.8         8.0
16      60             12.1       16.0
32      47             15.4       32.0
If we plot the Speed-up against the number of cores and also plot the linear speed-up we can see that the performance of the software is tailing off as we go beyond 8 cores:
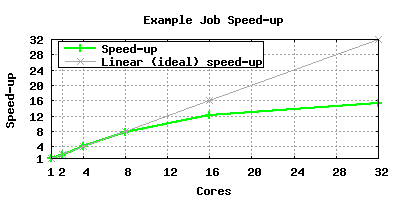
Hence for this application, jobs should be run with up to 8, or possibly 16, cores but requesting 32 cores would not provide a lot of benefit.
Running your work after you have done the scaling tests
We recommend that you do not continue to submit your work with an architecture flag because this will limit where your work can run and can lead to an increased wait in the queue (and we can’t guarantee that some of your work starts within the 24 hours we aim for). The scaling should help you establish a number of cores that suit your job, but you will find that the runtimes are different depending on which node type your job gets. If you find you are getting vastly different times once you run lots of jobs on n cores then you are welcome to contact us to see if we can advise further.
Can my software benefit from using more than one node?
That depends. The above scaling advise is based on trying it on a single node. If your software has MPI enabled (not all apps can have MPI) then it may be able to use more than one node.
If we have documented the software in our software section then we will have clearly indicated there if it can use more than one node and we will have provided an example jobscript.
If we have not documented your software you can find out by checking to see which libraries are loaded when you load the software:
module purge
module load apps/intel-17.0/myapp/1.2.3      # Replace this with your software module file name
module list
You should now be able to see something like this:
Currently Loaded Modulefiles:
  1) compilers/intel/17.0.7
  2) libs/ucx/1.5.0
  3) mpi/intel-17.0/openmpi/3.1.3-ucx
  4) libs/cuda/9.2.148
  5) apps/intel-17.0/myapp/1.2.3
The presence of an openmpi module file, in this case mpi/intel-17.0/openmpi/3.1.3-ucx, shows that we should be able to use more than one node.
To test it create a jobscript similar to this one
#!/bin/bash --login
#$ -cwd
module load apps/intel-17.0/myapp/1.2.3        # Load the modulefile in the job

# Run the app using one core. The $NSLOTS variable is automatically set to the
# number of cores assigned to your job.
# Check the our docs/the official docs of your app to find out how to set up the command line below.

mpirun -n $NLSOTS myapp -in mydata.dat -out myresults.$JOB_ID.dat
Then submit it thus:
qsub -pe mpi-24-ib.pe 48 myjobscript
qsub -pe mpi-24-ib.pe 72 myjobscript
qsub -pe mpi-24-ib.pe 96 myjobscript
qsub -pe mpi-24-ib.pe 120 myjobscript
Note: we do not have many nodes in the CSF3 for running this type of work so it may take a while for the above jobs to start and run.
For each job check the job accounting information as per step 4. above. Did you see a good improvement over running on just one node? Did you see an improvement across all the jobs as the core count increased? If yes, then this may be a good place on the CSF to run your work. You may also want to consider applying to use The HPC Pool and the sacling information you have gathered is an essential part of requesting access.