| The CSF2 has been replaced by the CSF3 - please use that system! This documentation may be out of date. Please read the CSF3 documentation instead. To display this old CSF2 page click here. |
ParaView
Overview
ParaView is an open-source, multi-platform data analysis and visualization application. Versions 3.14.1 and 4.0.1 were compiled on the CSF using gcc (default version) and OpenMPI 1.6. The 3.14.1 installation includes ParaView development files and the Paraview GUI. Version 4.0.1 contains only the pvserver and pvbatch off-screen executables only.
ParaView will not use any GPU hardware in the CSF. Instead all rendering is performed in software on the compute nodes.
There are three ways to run ParaView:
- The preferred method of running ParaView is to install and run the GUI (
paraview) on your local PC and run the parallel processing and rendering part of ParaView (pvserverprocesses) on the CSF in batch. Your local copy ofparaviewwill then connect to the CSF and use thepvserverprocesses. This is efficient because only the final rendered image is sent to your PC over the network (no remote X11 used). Your datasets (which could be huge) are stored and processed entirely on the CSF. The remainder of this page describes this method. - Running the
paraviewGUI on the CSF over a remote X connection: this is not the best way to run ParaView. However, if you cannot install ParaView on your local PC then this method will work. But do not simply runparaviewon the login node. Please follow the instructions for running everything on the CSF. - For non-interactive (scripted) use, the
pvbatchexecutable is available. See below for how to run this process in batch.
| Please do not run ParaView directly on the login node. Such processes will be killed without warning. |
Restrictions on use
There are no access restrictions as it is free software.
Installing ParaView on your local PC
You are going to run the paraview GUI on your PC and connect it to the CSF. To install ParaView on your PC please download version 4.0.1 or version 3.14.1 from the ParaView Download page for your platform. You can use the Windows/Linux 32/64bit versions.
Once installed on your PC, do not run ParaView just yet. You first need to start the pvserver MPI job on the CSF and then set up an SSH tunnel on your PC. Full instructions are given below.
Running pvserver in batch on the CSF
The pvserver MPI processes can be run on multiple compute nodes with fast InfiniBand networking (for large jobs) or a single compute node for smaller jobs. When using InfiniBand connected nodes there is a minimum number of processes and the number must be a multiple of 12 or 24 depending which nodes are used – see example jobscripts below for details. On a single compute node a smaller number of cores can be used (up to 24 cores).
See the Paraview Hints below for how to work out how many cores to run.
The modulefile to load and a suitable jobscript for each option are described below. Choose one of these. The modulefile will also load the appropriate MPI and python modules.
Note: If you’ve attended the ParaView Course and have a temporary course account you should choose the SMP single-node method.
pvserver over InfiniBand (large multi-node jobs)
Setup the environment by loading an InfiniBand version of the available modulefiles – choose one:
module load apps/gcc/paraview/4.0.1-ib
or
module load apps/gcc/paraview/3.14.1-ib
Create the following jobscript (e.g., naming it pvserver-ib.sh):
#!/bin/bash
#$ -S /bin/bash
#$ -V
#$ -cwd

#$ -pe orte-24-ib.pe 48   # Change number of cores, must be 48 or more
                          # and a multiple of 24.

#### Run pvserver ($NSLOTS is automatically set to number of cores given above)

mpirun -n $NSLOTS pvserver --use-offscreen-rendering
Then submit the above jobscript using
qsub jobscript
where jobscript is the name of your file (e.g., pvserver-ib.sh)
pvserver in SMP (small single-node jobs)
Setup the environment by loading an non-InfiniBand version of the available modulefiles – choose one:
module load apps/gcc/paraview/4.0.1
or
module load apps/gcc/paraview/3.14.1
Create the following jobscript (e.g., naming it pvserver.sh):
#$ -S /bin/bash
#$ -V
#$ -cwd
#$ -pe smp.pe 4         # Change number of cores (max 24)

#$ -l short             #  Optional (max 12 cores) - depends how long you'll
                        #  leave your local paraview GUI running.

#### Run pvserver ($NSLOTS is automatically set to number of cores given above)

mpirun -n $NSLOTS pvserver --use-offscreen-rendering
Then submit the above jobscript using
qsub jobscript
where jobscript is the name of your file (e.g., pvserver.sh)
Find where the pvserver batch job runs
You must now wait until the pvserver jobs are running. Use qstat to check the job queue. Once the state reported by qstat has changed from qw to r you will see something like:
job-ID  prior   name     user     state submit/start at     queue                          slots
------------------------------------------------------------------------------------------------
5724  0.05534 pvserver.q xxxxxxxx r     08/28/2012 17:06:57 C6220-II-STD.q@node537.prv.csf     4
Make a note of the queue value, specifically the hostname after the @. In this example we see node537 (you don’t need the .prv.csf....).
We are now going to run the paraview GUI on your local PC and connect it to the pvserver batch job.
Running paraview On Your Local PC and Connecting to CSF
This is a two step procedure
- Set up the SSH tunnel to the CSF (if off campus run the VPN first)
- Run
paraviewand connect to the SSH tunnel
Separate instructions are given for Windows and Linux. At this stage you must have ParaView installed on your local PC (see above).
SSH Tunnel on Linux
In a shell on your PC, create a tunnel between your local port 11111 and the CSF backend node’s port 1111 where pvserver is running. This will go via the CSF login node. In this example we assume the pvserver is running on node node537.
ssh -L 11111:node537:11111username@csf2.itservices.manchester.ac.uk
where username is your CSF username and node537 is the node where pvserver is running (use qstat on the CSF to find out). Do not close this shell. This connection must remain open to use ParaView. You do not need to type any commands in to this shell.
Now open a new shell window on your PC and start paraview as follows:
paraview --server-url=cs://localhost:11111
ParaView will connect to the pvserver processes through your local port 11111. This has been tunnelled to the CSF backend node where the processes are actually running.
Now jump to A Quick Test and Render Settings to ensure everything is working correctly.
SSH Tunnel on Windows
You must have an SSH client, such as MobaXterm or PuTTY, installed. You do not need an X-server installed because we are going to run a locally installed Windows version of ParaView.
If using MobaXTerm, start MobaXTerm on your PC then simply copy the ssh command given in the Linux instructions above in to the black MobaXTerm window (don’t forget to use the appropriate node name – e.g., node537 and so on – appropriate to your job – see above).
If using PuTTY, it is a little more complicated to set up the SSH tunnel. Follow the instructions below:
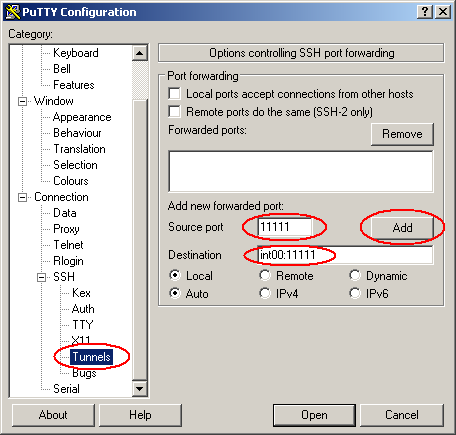
- Note: in the screen-shots below we use
int00as the name of the compute node where our CSF job is running. Replaceint00with the value you noted in the previous section (e.g.,node537). We used to have nodes namedint00and so on but your CSF job could be running on another node. - Start PuTTY and edit the Tunnels settings to use
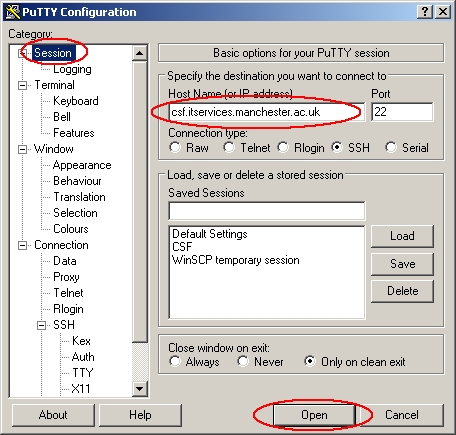
Source port: 11111andDestination:int00:11111whereint00is the node on whichpvserveris running, noted earlier (useqstaton the CSF to find out). - Now use PuTTY to connect to the CSF login node using Host Name:
csf2.itservices.manchester.ac.uk
- If a PuTTY security window pops up, click on Yes
- Enter your CSF username and password when prompted
- Do not close this window. This connection must remain open to use ParaView. You do not need to type any commands in to this window.
Run the Paraview GUI
Now start your local installation of paraview. Once the GUI has appeared do the following:
- Go to File > Connect
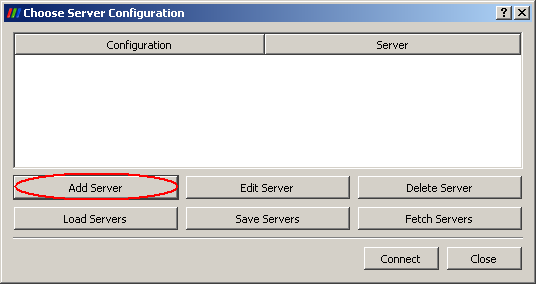
- In the Choose Server Configuration window that pops up, select Add Server
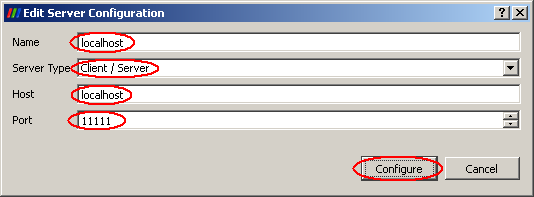
- Fill in the form to connect to your local port 1111 using the following then hit Configure:
- Name:
localhost - Server Type:
Client / Server - Host:
localhost - Port:
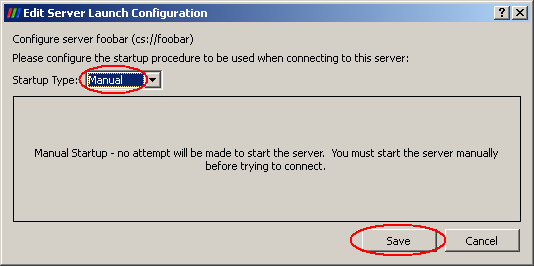
11111 - In the Server Launch Configuration window ensure Manual is selected and hit Save
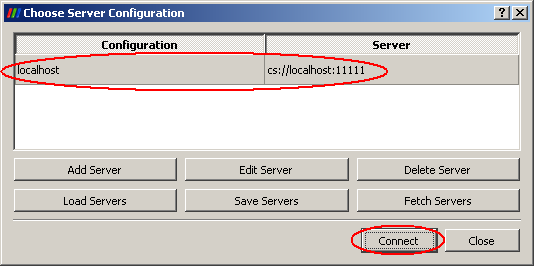
- Now select your saved configuration and hit Connect
ParaView will connect to the pvserver processes through your local port 11111. This has been tunnelled to the CSF backend node where the processes are actually running.
Now jump to A Quick Test and Render Settings to ensure everything is working correctly.
A Quick Test and Render Settings
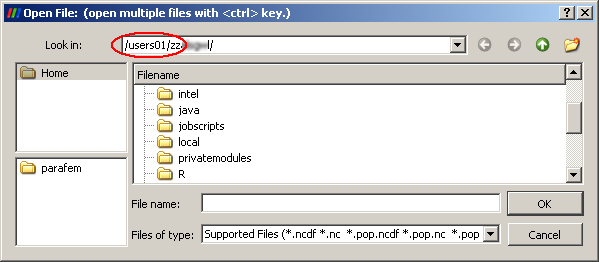
A quick test to see that your local paraview is really connected to the CSF is to see where paraview will load files from:
- Go to the File > Open menu to begin loading a dataset
- You will see that the file browser is showing files on the CSF, not your local PC’s files. This is correct. We are using the CSF to run multiple
pvserverprocesses and so we want those processes to read your large datasets stored on the CSF.
To ensure your local paraview client does no rendering work you should change the render settings in paraview. The default is to have your PC do a little bit of rendering work. We don’t want it to do any to save transferring data from the CSF to your PC.
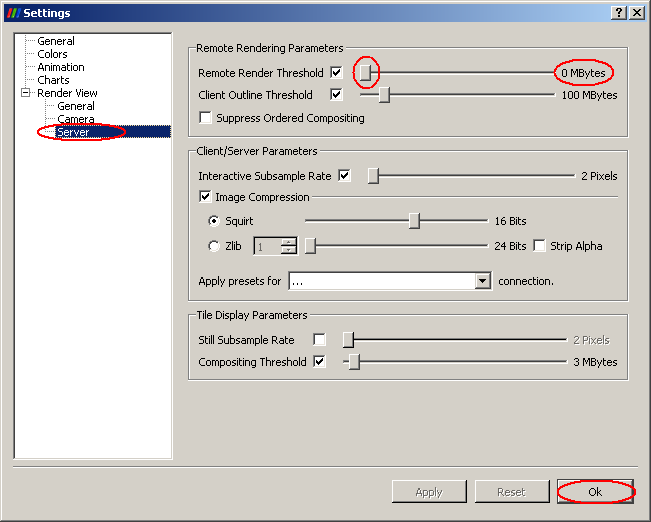
- In the
paraviewGUI go to Edit > Settings… - In the Render View > Server panel, slide the Remote Render Threshold to zero (left). Do not uncheck the slider. This will cause all rendering to be done on your PC!
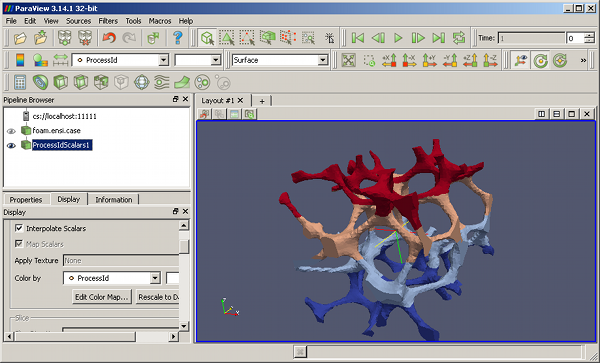
Another useful way of checking what the remote pvserver processes are doing is to load a dataset and then shade the data according to the processor ID on which the data is residing (ParaView distributes your dataset amongst the pvserver processes).
- Go to the Filters > Alphabetical menu and select Process Id Scalars. In the Properties tab hit Apply to see your dataset rendered with a different colour for each
pvserverprocess. This shows how the data has been distributed amongst the processes.
Exit and Clean up
Exiting from the paraview GUI will stop the backend pvserver processes, at which point you will have no ParaView jobs running in the batch system.
If the paraview GUI freezes or hangs it usually indicates a problem with the backend pvserver processes. Check the pvserver.sh.oNNNNN or pvserver.sh.eNNNNN log files created by the batch job (the pvserver.sh name will actually be what ever your jobscript was called). The most common problem is that the pvserver processes run out of memory because you don’t have enough running for the size of your dataset.
If your local paraview GUI crashes you should run qstat on the CSF to check if the pvserver processes are still running. If so, use qdel NNNNNN to kill the batch job.
Running non-interactive (scripted) pvbatch (large datasets)
The paraview GUI should not be running at this point.
After loading the ParaView modulefile use a jobscript to launch the pvbatch MPI processes. For example, to launch 4 backend processes, create the following jobscript (e.g., naming it pvbatch.sh):
#$ -S /bin/bash
#$ -V
#$ -cwd
#$ -pe smp.pe 4  # pvbatch is an MPI app so can also use:
                 # orte-24-ib.pe for multiples of 24 cores
                 # (use with the apps/gcc/paraview/4.0.1-ib or
                 # apps/gcc/paraview/3.14.1-ib modulefiles).

# Ensure the paraview modulefile is loaded

mpirun -n $NSLOTS pvbatch scriptfile
                               #
                               # where scriptfile is the file
                               # containing your paraview script
Then submit the above jobscript using
qsub jobscript
where jobscript is the name of your file (e.g., pvbatch.sh)
Please see Batch Processing in the ParaView Users Guide for more information on using pvbatch.
ParaView Hints
- If using
pvserverprocesses choose a sufficient number that you can load your dataset. Eachpvserverwill load at most 2GB worth of data (due to MPI restrictions). - If using the movie maker, the AVI frame rate must be a power-of-2. 16 or 32 are reasonable values.
- Use the raycaster method when volume rendering for good results and performance.
Sample Data
Once the module is load you can see the ParaView sample data in the directory:
$PARAVIEW_HOME/ParaViewData-3.14.0/Data/
Note the version number of the data directory is different to the software version because the sample data does not get updated between point releases.
Troubleshooting
- Linux desktop: if you connect to
pvserverprocesses from a linux desktop and see nothing rendered in the GUI after loading data, applying filters etc then your local OpenGL library may not support the 32bit visual required by the GUI. This has been seen on linux desktops running Mesa 6.5.1. You’ll see a message fromparaviewsimilar to
libGL warning: 3D driver claims to not support visual 0x5b
libGL.so library (e.g., using Mesa) then set LD_LIBRARY_PATH to the directory where your libGL.so file is located. paraview will actually look for a file named libGL.so.1 which is usually a symlink to libGL.so.Further info
The ParaView GUI will not display online help. Instead please see the ParaView Users Guide and the ParaView Wiki.
Updates
- 26/10/12 Added instructions for connecting a local paraview client to the CSF over an SSH tunnel

